
After his engine dies while motoring in a swell, Richard Thomson decides to install an auxiliary diesel day tank on his vintage yacht
The wind was dying with the light after a lively passage down the western Peloponnese, but the lumpy sea remained.
As we sloshed around in the swell my wife, Maxi, and I easily decided to fire up our two-year-old Volvo Penta engine for the last four miles into Pylos.
Fifteen minutes later the engine note suddenly wandered. It groaned in protest and promptly died. We shared a look. I dashed inside to investigate.
Engine failure
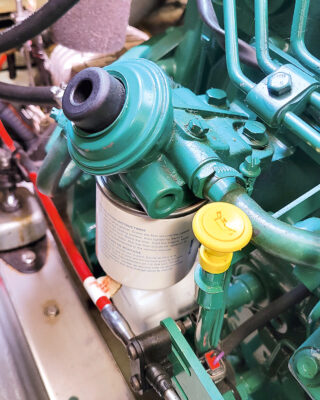
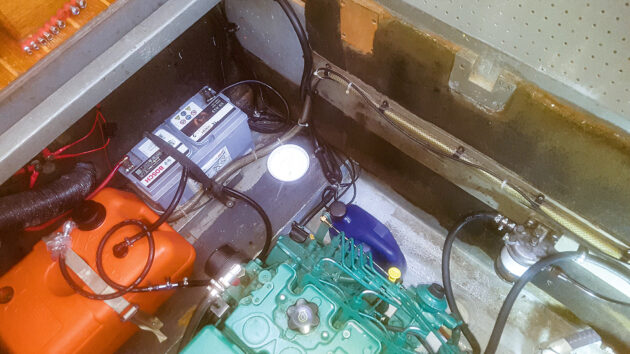
Our engine bay is vast and lies under the saloon floor of Namika, our Angus Primrose-designed 1983 Trident Marine Voyager 38. I lifted and secured the trapdoors, then climbed in.
The sea water filter was clear, and the shaft was still spinning with our momentum. The primary filter bowl was clear, and our fuel was only weeks old. Nothing looked untoward, but fuel seemed the most likely culprit.
An attempt to depress and release the manual priming pump confirmed this, so as we rolled around in the swell I set about changing the primary filter. It looked clear, but I swapped it nonetheless and tried to prime again.
Nothing. The rubber boot remained depressed. Maxi alerted me to a yacht heading our way.
Unsuccessful attempts to depress and release the priming pump confirmed that fuel was the problem. Photo by Richard Thomson
We hailed them, and they kindly agreed to shadow us, but were afraid to tow us into Pylos with the swell and insisted we call the coastguard.
We hoisted more sail to try to get some way on Namika, but the zephyrs were now completely gone, and the sails banged furiously as we rolled. We tinkered some more.
With just two miles of sea room and the swell gradually sweeping us ever closer to the rocky shore of the Peloponnese, with our generally very patient dog, Minca, growing restless as the night closed in, and with our own nerves also somewhat fraught, we decided to take that advice and called the coastguard. They were very professional and arrived about 40 minutes later.
Fouled fuel lines
The next morning, I removed all the fuel lines to discover a mixture of gluey slime, sludge and grit clogging the hose, fuel cock and various connections from the tank to the filter.
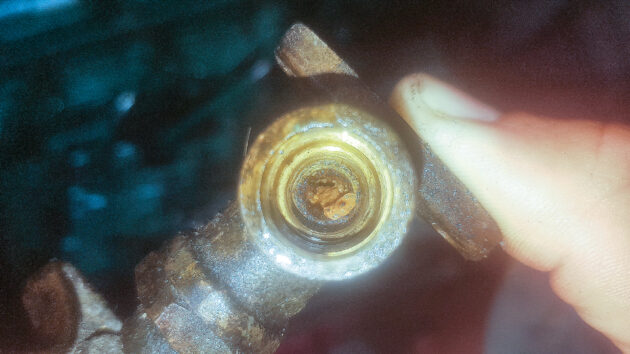
The slimy, gritty sludge that stopped the engine. Richard picked, prodded, pulled and used a dinghy pump to force air through all parts of the system. Photo by Richard Thomson
A full day of picking, prodding, pulling and using a dinghy pump to force air through all parts of the system eventually cleared the lines. I then pumped the entire contents of the tank through a makeshift polisher, but pulled only clean fuel.
We reconnected everything, primed and successfully started the engine, and over the next two days completed the necessary paperwork with the coastguard.
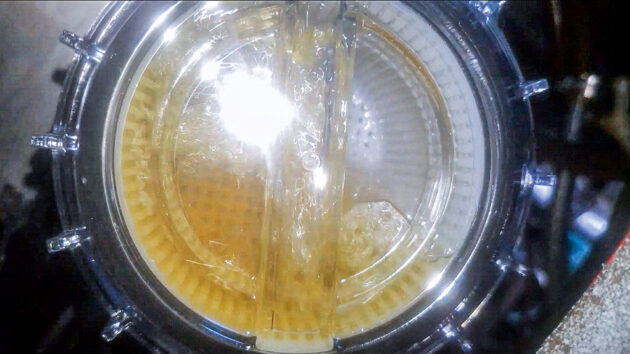
Richard disconnected the sight glass and pumped the contents of the tank through strainers but pulled nothing but clean fuel. Photo by Richard Thomson
We also acquired an outboard fuel tank and some extra fuel hose, to be connected in case the problem recurred.
That season, we covered another 1,500 miles without further issue. However, we knew we’d been lucky and would have to find a longer-term solution over the winter.
An outboard motor tank was used as an emergency fuel tank until a permanent solution could be found. Photo by Richard Thomson
Diagnosing begins
Was it diesel bug?
I don’t know. The fuel had been in the tanks for just two weeks (though we didn’t know how long it had been at the fuel dock). It had been dosed on filling with diesel bug treatment.
The tanks had been drained in the off-season, though not cleaned. Like many older boats, Namika’s diesel tanks don’t have inspection hatches, and their location beneath the floor of the galley cabinetry would require major surgery to install these.
I had considered it before our incident, but had not done it. There was a great article in PBO a couple of years ago with a very similar story where the owner cut hatches, but our access to the top of the tanks was significantly worse than in the example.
Cutting inspection hatches would require major surgery to the cabinetry to access the top of the fuel tank. Photo by Richard Thomson
My makeshift polisher pulled only clean fuel, so if it was diesel bug, it was a very limited case.
Another possibility was fuel degradation, which is where modern diesel (with its higher percentage of biodiesel than in previous decades) is more prone to rotting, a bit like a banana skin in the compost.
Finally (and perhaps most likely) given the lack of inspection hatches, the tank has probably never been cleaned, and so dirt and degraded diesel had accumulated over the last 40 years and possibly become stuck to the tank, but then been loosened and stirred up in the swell.
Whatever it was and however it got there, the slime, sludge and grit were enough to block the dip pipe, fuel lines and fuel cock all the way to the filter, without reaching the filter itself.
Ultimately, fuel problems are increasing overall, so perhaps the exact cause is not that important.
As noted by Sea Start engineer Nick Eales: “since the roll-out of bio-based diesel, we’re seeing blockages a lot more.”
Certainly, the swell had stirred up the fuel in the tanks, and fuel blockages in heavy swell are much more common than when motoring on a gentle sea.
What is also clear is that if I’d been able to scrub those tanks spotless via inspection hatches, then our incident probably wouldn’t have happened.
Inspection hatches: possible pitfalls
However, great as inspection hatches are (and I wish we had them), I’m not convinced they alone are the golden ticket some would claim.
Inspection hatches often don’t allow great access to every crevice of a tank. I’ve heard plenty of stories of scrubbing with a cloth on a stick while using a torch to illuminate the tank and peering sideways at a phone camera to check the progress; I just don’t believe that in such a case you could guarantee that the tank is spotless.
The slime/sludge from our blockage probably weighed a few grams at most and could have escaped scrubbing in a corner or along an edge.
Secondly, even with a well-placed inspection hatch, you still don’t know the state of the fuel filler hose or the fuel dip pipe within the tank itself.
I had to force air through the dip pipe to clear the last blockage. It’s possible the dip pipe and other connections had been slowly silting up over time.
Lastly, even if your tank is spotless, you’re also at the mercy of the fuel you buy.
While this should ideally be strained before fuelling, you still have no idea how long the fuel has sat in the tanks at the fuel dock. In some cases, the diesel could already be degrading, pass through your strainer, and then coagulate in your previously spotless tanks thereafter.
In our case, the attraction of fitting inspection hatches was further diminished by the surgery that would be required to fit them; given the age, location of the tanks and the challenge getting to their top surface means when the time comes I might be more inclined to replace them with a single tank, slightly lower tank.
Weighing up the options: Polishing system vs diesel day tank
We considered a polishing system, but decided against it as we felt it couldn’t guarantee that our tanks were clean. Instead, after research and deliberation we opted to install a diesel day tank, which would directly feed the engine.
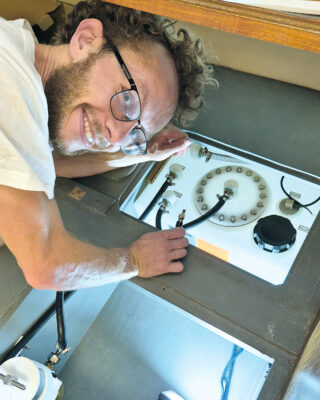
Connecting up the diesel day tank. Photo by Richard Thomson
The basic principle would be that this new tank would have diesel pumped to it from the main tanks via our existing CAV-type primary filter and water separator. That means we’d have a few dozen litres of filtered fuel ready to go.
If a blockage from the main tank were to occur, we would still have the contents of this smaller tank to get us out of trouble and give us the time to fix the blockage upstream of the diesel day tank.
After a little refining of the basic idea, we planned to add an inspection hatch for cleaning (being a small tank, this inspection hatch would allow excellent access to the whole tank).
It would also have a fuel sender and gauge. We also decided to add a screw-on filler cap for refuelling via jerry can if ever we had a blockage from the main tank and urgently needed fuel.
For this eventuality (and to add some comforting redundancy), we also chose to add a second primary turbine filter and water separator between this new tank and the engine.
The Racor turbine filter and water separator between the tank and the engine. Photo by Richard Thomson
For us, this built-in redundancy was the appeal of the solution. It also avoided the major surgery to the cabinetry (for now), would be much quicker to install, and should make our fuel supply to the engine pretty much bomb-proof.
I debated adding an interface between the fuel sender and the transfer pump to automatically refill the diesel day tank as fuel was burnt, but decided against it as an unnecessary complication.
Instead, we’d locate the fuel gauge so it was visible in the saloon, next to the transfer pump switch. Keeping it simple also allows us to have a better overview of what’s going on, and prevents the pump from running continuously if a blockage were to occur.
Location, location, location
Next we had to choose where to install the tank.
I measured a few locations before leaving the boat for the winter, but I was keen to locate the tank above the engine, where gravity would assist the engine’s lift pump and where access would be easier underway if necessary.
Locating the tank, pump and filter elsewhere would keep our engine bay clear and allow for easier ongoing maintenance there, with the added benefit that the fuel cock would now be outside the engine bay, a handy safety feature.
Having previously replaced a water tank with a Tek-Tanks product, we’d been really impressed with the build quality and decided to use them again.
The company offers fully customised options, but also a huge variety of standard sizes and shapes to which it adds your desired fittings; this significantly reduces the cost if you can get a size that will fit.
For both our previous water tank and this new diesel day tank, we were able to use a standard size. We chose a 31lt rectangular tank as it was the best fit for our preferred location under one of the saloon benches. It should hold enough fuel for between 10 and 15 hours of continuous motoring.
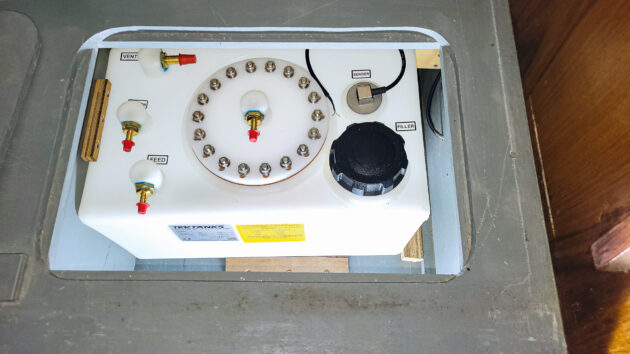
The new diesel day tank is braced in position beneath the saloon benches and ready to connect fittings. Filler cap is for emergency filling with a funnel. Photo by Richard Thomson
We provided a drawing to Tek-Tanks to identify where we’d like the fittings. The fuel dip pipe would be centrally located in the middle of the inspection hatch, allowing for removal and occasional cleaning if desired.
There would be a fuel return line from the engine (many marine diesel engines draw far more fuel than they burn and so are continuously polishing the fuel).
There would also be a fuel feed from the main tanks via the transfer pump, a fuel sender to be wired to the gauge, and a screw on filler cap.
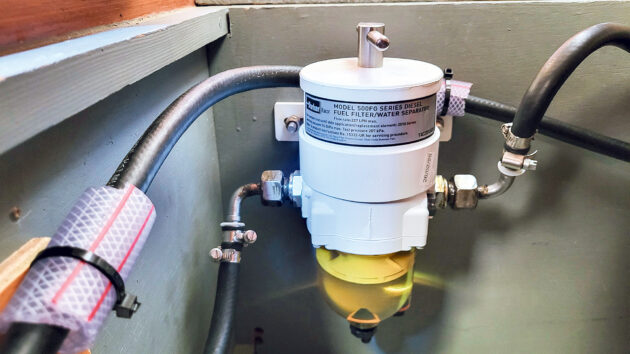
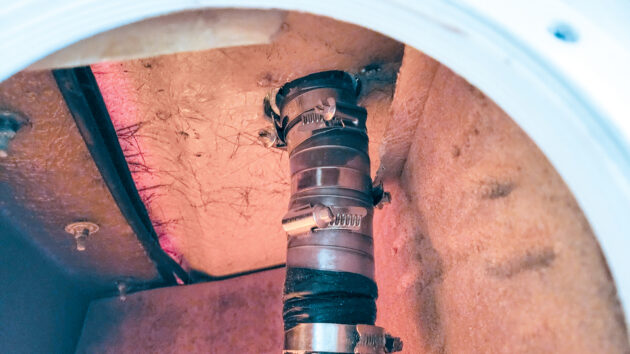
We chose a Marco self-priming bronze-geared pump for transferring fuel from the main tank, and a Racor turbine filter and water separator to install between the diesel day tank and the engine; among other advantages, these don’t require any tools for a filter change.
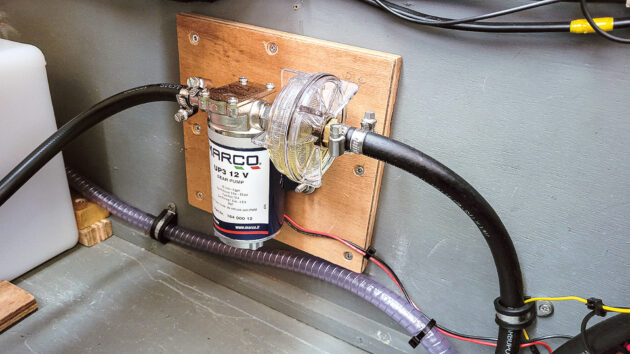
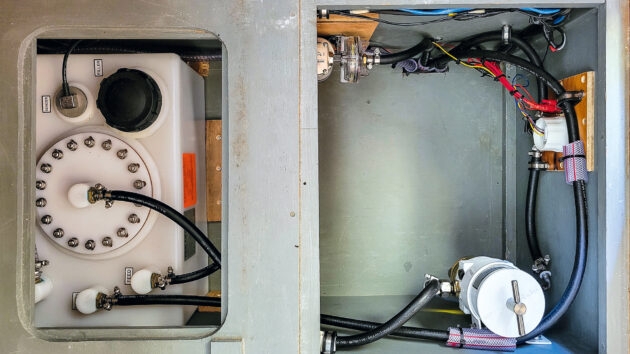
The Marco self-priming transfer pump pulls fuel from the main tank, through our existing primary CAV filter, through its integral wire strainer, and to the diesel day tank. Photo by Richard Thomson
Installing a diesel day tank
On arrival back at the boat, I cleared the chosen locker and used some wooden offcuts to brace the tank in position.
I cut two holes through which to run hoses, one in the corner of the locker floor and another from there to the engine bay.
After mounting the filter and pump within the locker, the fuel hose was cut to length and connected to the engine, tank, filters, pump, fuel cock and breather.
There were a few metal-to-metal thread connections which we sealed using Heldite jointing compound.
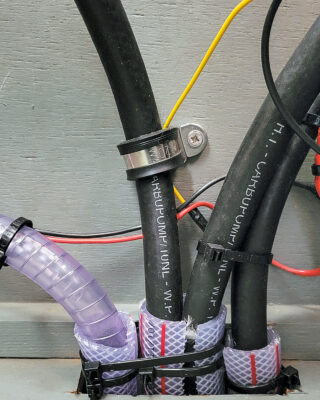
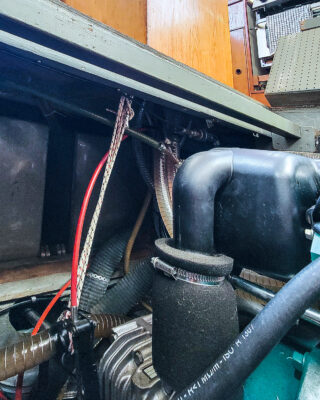
Hoses are protected from abrasion with a garden hose sheath where they pass through the boat structure. Photo by Richard Thomson
We used rubberised hose clips to secure the fuel hose to the cabinetry and protected the hose where it ran through the locker floor and into the engine bay by using a sheath made from garden hose, held in place with cable ties.
This would mitigate against the risk of abrasion where the hose passed through structural members.
The next job was the electrical connections, and I took the opportunity to remove a defunct and rusty speaker and build a recessed control panel in its place using some salvaged marine plywood and teak scraps.

The control panel with the LED fuel gauge and pump switch. Photo by Richard Thomson
Into this new panel I mounted the LED fuel gauge and pump switch. Having rewired the boat last year, it was then straightforward to run wires from here back to the secondary bus bar and fuse block I’d installed for loads in the aft end of the boat.
By recessing the switch (and fuel gauge), it is now well protected from accidental switching.
System testing our diesel day tank
We pumped some fuel across to test, ran the engine to check for leaks, and all went as planned.
To finish off the locker, I screwed some plastic boxes into the remaining space which we used to store spare filters, our diesel bug treatment additive and a few other engine spares. This gives us a dedicated fuel locker.
While it shouldn’t happen given the fuel in the diesel day tank is all pre-filtered, changing the Racor filter now requires access to just a locker in the saloon, rather than the whole engine bay under the saloon floor.
This makes it much more user-friendly in any sort of seaway, especially as the engine becomes hot even if it is run just for a short time. These are things you only really ‘know’ after having to brace yourself in the engine bay in a nasty, rolling sea.
We also took the opportunity to replace our deck filler cap, which I suspected was no longer completely watertight (although we’d never detected water in our water separator). Moisture accelerates fuel degradation and is a prerequisite for the growth of diesel bug; not good news.
Replacing the filler cap involved cutting an inspection hatch inside a small cupboard to access the hose and hose clamps; these had been panelled in when the boat was built back in 1983, so no-one had accessed them for 42 years!
Having removed the old fitting, I used a wooden bung to protect the filler hose from dirt and then modified a TruDesign glassfibre skin fitting to form a raised base on which to mount the new filler cap.
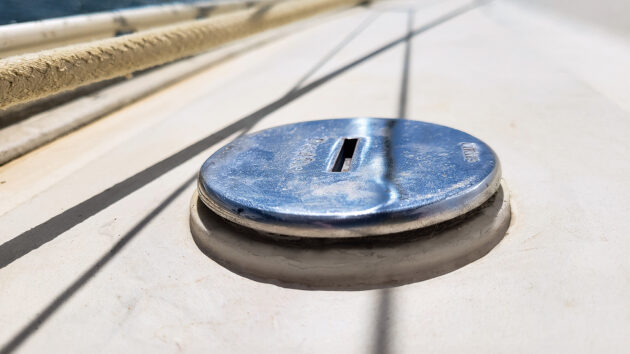
The new filler cap now stands proud on a modified skin fitting, with a stainless steel mushroom cap which the water can run off. Photo by Richard Thomson
This has the advantage of keeping the opening above the level of the deck, and thus above any water on it. We inspected the balsa sandwich in the deck and were pleased to note it was dry and looked good, and then epoxied the modified skin fitting into the hole and left it to cure.
I then connected up the fuel filler hose to the new stainless steel mushroom-style filler cap, drilled holes in the skin fitting, and used screws and Sikaflex 291i to secure and bed the fuel filler cap into the skin fitting.
A fuel filler hose extension connected up to the new filler cap thropugh the deck. Photo by Richard Thomson
The filler cap is now a centimetre above the level of the deck, and the stainless mushroom cover ensures water runs off the cap rather than sitting on top of it. Where before the O-ring was the only line of defence against the water, it’s now the last.
While it stands slightly proud, the nice, rounded shape is not uncomfortable to walk on.
It might not be the sort of thing you typically see at a boat show where flush fittings are aesthetically more appealing, but it’s surely much more effective at keeping water out.
Further upgrades
Aside from eventually replacing our main diesel tanks, I’m planning another fuel supply improvement: installing a dehumidifier gel strainer on the tank breather.
The tank breather is another point of entry for moisture to the fuel, and one that is often overlooked, although the quantities of water are generally small.
As the fuel is burnt, air is pulled in via the breather to fill the space in the tank, and in summer this air will generally be warm. Warm air holds more moisture than cool air.
Down in the depths of the boat where it is often cooler (or over the winter when it certainly is), the moisture in the air condenses, leaving small amounts of water in the tank.
This is why it was often recommended in the past to leave tanks full over the winter, although that is no longer considered best practice.
For now, we’re delighted to be back on the water and to have the peace of mind that we have 10-15 hours’ worth of fuel ready to feed our engine, pre-filtered, and free of water.
With fuel issues leading to an increase in breakdowns and lifeboat callouts (and having been lucky enough to escape just such a stressful and potentially dangerous situation ourselves), I think it’s a great upgrade.
We did all the work ourselves over the course of two-and-a-half days. Total costs came to around £800 (approximately broken down to around £400 for the tank, various fittings and fuel gauge; around £250 for the Racor filter housing and spare filters; around £150 for the transfer pump and fuel hose).
We could have modified the external outboard motor fuel tank and used it as the diesel day tank, which would certainly have been cheaper than our semi-custom Tek-Tank.
That said, it wouldn’t have had all the fittings we wanted to add or be as robustly built, and it only held 18lt.
We also could have done without the second filter, but again we were keen to have that redundancy. Weighed as a significant safety feature against the wider cost of the boat, these were decisions we easily made.

Photo by Richard Thomson
Richard Thomson learned to sail on the west coast of Scotland. A spell of teaching and skippering in the US, Caribbean and Mallorca followed. He now works as a sailing and history illustrator. In 2022, Richard and his wife, Maxi, bought the Trident Marine Voyager 38 Namika and are currently cruising in Greece with their dogs.

How to service a marine diesel engine in 12 simple steps
It was time to service the marine diesel engine on our Maxi 84 cruiser. Knowing how to diagnose and fix…

Petrol or diesel, inboard or outboard: which boat engine is best?
When it comes to a boat engine, which is best? Petrol or diesel, inboard or outboard? Stu Davies answers your…

How to: troubleshoot your diesel engine electrics
Even when you’ve done all your normal pre-departure checks, sometimes the engine still just won’t start. If you have ever…

How to service your marine diesel engine
The unique challenges of the marine environment mean regular engine servicing is essential for any boat owner. Winter is the…
Liked this article about installing diesel day tank?

A subscription to Practical Boat Owner magazine costs around 40% less than the cover price.
Print and digital editions are available through Magazines Direct – where you can also find the latest deals.
PBO is packed with information to help you get the most from boat ownership – whether sail or power.
-
-
-
- Take your DIY skills to the next level with trusted advice on boat maintenance and repairs
- Impartial, in-depth gear reviews
- Practical cruising tips for making the most of your time afloat
-
-
Follow us on Facebook, Instagram, TikTok and Twitter