
A fouled anchor doesn't have to mean losing costly ground tackle. If the conditions are right, you can save the day with a mask and snorkel, says Richard Hare

The poor chap on the foredeck of the little charter yacht looked exasperated. His anchor was fouled, caught around the main power cable that links Kalamos island to mainland Greece – a cable clearly indicated by a notice board on the beach.
Ouch! Meanwhile, we were anchored about 50m upwind of him, and I knew the water here was shallow, somewhere between 3 and 4m (9-12ft), so the stuck anchor was trapped at a depth comfortably within the range of someone with some snorkel diving technique.
In this case, that person was me, so I dived down and attached a tripping line, allowing the fouled anchor to be manoeuvred free of the cable.
Prudent boatfolk attach a tripping line every time they anchor, but how many of us actually do?
The couple of times I’ve tried it, I ended up with the line in a figure of eight around my bilge keels. So much for prudence.

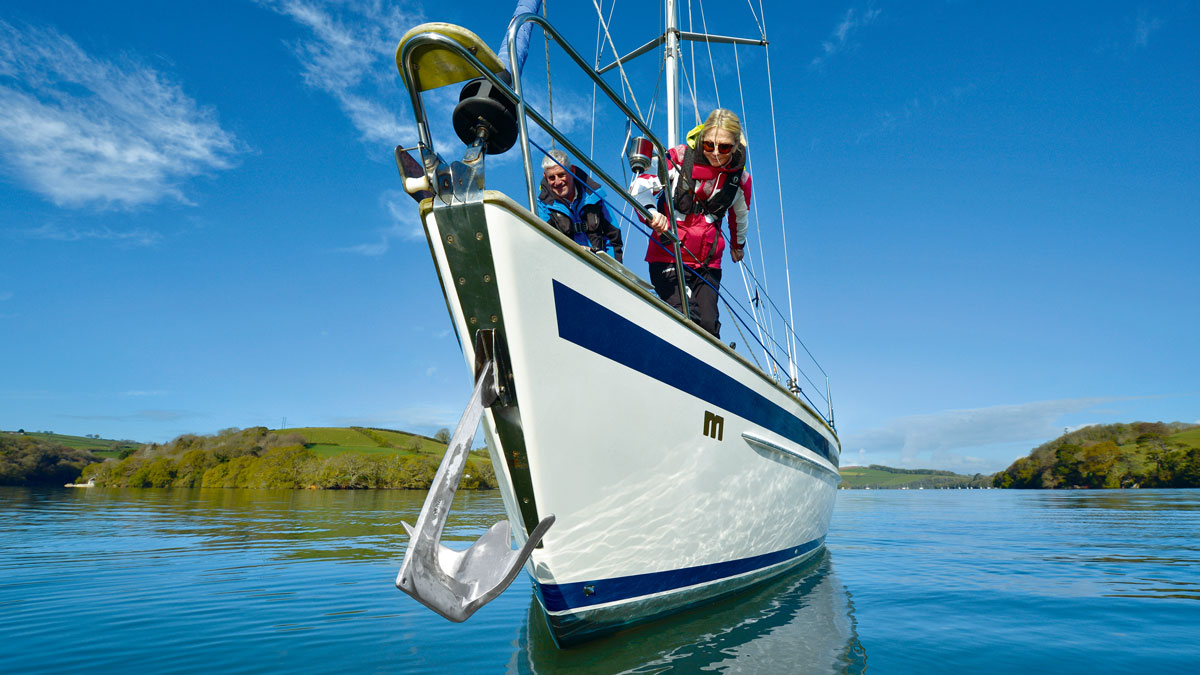
A snorkel gives you a better chance of diving to retrieve a fouled anchor
Out there on the foredeck, when the anchor is fouled, the reality of our predicament sinks in as our meticulous tide-dictated passage plan disappears up the swanny.
We race through the options. Should we junk the whole lot and get going anyway? Casting off without proper ground tackle is irresponsible and dangerous, a last resort.
Chain buoyed, should we pay a professional diver to recover it later on – which might be the same as the cost of new ground tackle? It makes sense to be self-reliant and recover our anchors wherever safe to do so.
Better still, we must take steps to avoid entrapment in the first place.
In clear seas, this is often easy to do, and leads to another issue: depth.
Minimise the risk of a fouled anchor
The golden rule is to anchor in shallow water, no more than 5m in non-tidal waters, assuming there are no hazards nearby.
In tidal waters free of large swell, our depth can safely be reduced to just 1m below the keel at low water, enabling shallow-draught boat owners to attach a tripping line comparatively easily.

With the bowline through the carbine hook eye, the trip line can quickly be snapped onto the anchor either at the official attachment point or the brace
With the rode already shortened to virtually ‘up and down’, we won’t have far to wade or dive to reach the anchor.
Always check the soundness of the ground if wading, and wear a harness and lifeline.
Retrieval in deeper water, say 2m or more, means we have to duck-dive – so keep a mask and snorkel on board for the purpose.
A shortie wetsuit is invaluable too.
Why use a snorkel to free a fouled anchor?
A snorkel allows us to lie flat on the surface, completely relaxed. It enables us to take a few deep breaths and, being horizontal, we only have to orient ourselves through 90° to commence a vertical descent directly to the fouled anchor, our eyes having never left it.
Without a snorkel, we use vital energy keeping ourselves upright and our heads above the water. We’ll struggle to get a deep breath in choppy water.
Having panic-gulped a lungful, we then need to orient ourselves through 180° to make our direct descent, needlessly using energy.
With practice, it isn’t difficult to free-dive to 5m, and so long as we have no more than that at low water, it’s within the capability of many of us to attach a tripping line.
Speed is the essential factor when duck-diving: dive speed is something we just have to learn and gain confidence in doing.
It boils down to technique, so why not develop yours next time you’re on holiday somewhere warm, or in the swimming baths?
Fumbling with a bowline at 7m when we can already feel our lungs burning is a grim prospect, and needless too.
Save time by bending the bowline onto a carbine hook before you dive: being able to just snap it onto the tripping point of the anchor once you’re down there leaves you with more time for the descent and ascent.
Fins are a benefit because their weight above water, as you commence the dive, gives a useful shove, and by finning down, you move more quickly through the water and use far less energy than by pulling yourself down by your arms, breast stroke fashion.
The carbine hook must be large enough to snap onto your anchor. Any type will do, but those with a separate eyelet for the rope ensure it won’t get in the way when you snap it onto the anchor.
Unless it’s a very large hook, you’ll probably need a line of about 9mm diameter.
Weighing the tripper
When it comes to recovery on the foredeck, the tripping line must first be hauled to break the anchor free.
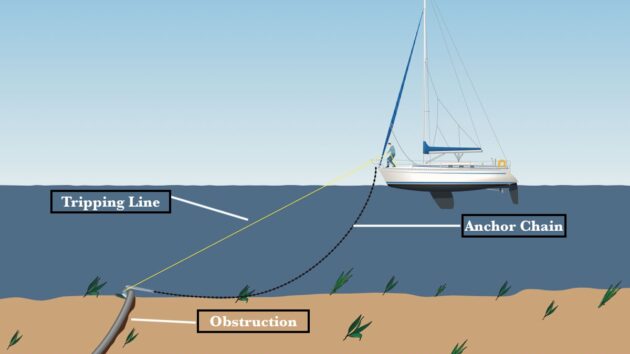
Weighing the tripper: With the tripping line connected to the anchor, the rope is hauled until the anchor is sufficiently re-oriented for it to break free of the obstruction
It’s heavy work, but if there’s plenty of searoom, the anchor should be lifted clear of the seabed with the tripping line, which is then cleated.
After that, the anchor chain can take the strain as usual. It can help to have a second person on the foredeck to take up the slack of the tripping line.
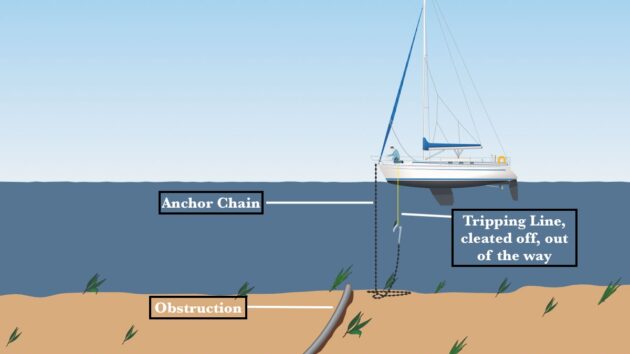
Ideally, haul the tripping line in to lift the anchor off the seabed (no chance of it snagging anything else) and then haul in the anchor chain as normal
If there’s restricted searoom, break the anchor loose from the seabed, then focus on hauling up the anchor immediately via the anchor chain.
If it catches temporarily on the bottom, it won’t matter.
At least we won’t be drifting onto a hazard.
Retrieval in murky tidal water
Even in the UK, the water can still be quite warm in summer months, and although visibility is frequently insufficient to see an anchor from the surface, this doesn’t mean a tripping line can’t be attached.
The problem is finding the anchor in murky water. The trick is to shorten the anchor chain so that it’s virtually ‘up and down’.
Allow the tide to reduce the sea to a safe diveable depth. If your chain has measurement markers – a 5m indicator is useful – you can accurately estimate how far down it is.
Here we need to drop into the water and carefully haul ourselves down the chain.
Remember, only put your hands where you can see them being placed. Sure enough, the chain will lead us to where we need to be. Clip on the trip line, and up we come.
An additional benefit of waiting until low tide is that the water will be slack. Losing a few hours waiting for low water is a small price to pay.
Benefits of a wetsuit
It isn’t only when anchors become snagged that we find ourselves ‘up to our neck’ with sub-aqua problems – there’s the fouled propeller scenario too.
Here, a mask and snorkel are of immense benefit, as is a wetsuit jacket.
It’s worthwhile investing in a 4mm- or 6mm-thick shortie wetsuit to keep on board for all sorts of purposes. Resist being sold anything thicker, as the excessive buoyancy affects your ability to dive easily.
Next time you visit your GP check that you’re fit enough to go diving – it’ll take her only seconds to peer into your ears to check for problems.
Duck Diving Techniques
This feature is not a comprehensive guide to snorkel diving or other anchor retrieval methods, but an indication of some of the options available. PBO recommends authorised training courses like those offered by the British Sub-Aqua Club (BSAC) and the Professional Association of Diving Instructors (PADI).
- Hover on the surface nearly directly above the fouled anchor.
- Hyperventilate with three long, deep breaths. This increases the oxygen level in your blood. Remain relaxed: tension wastes energy. Never do more than three deep breaths, as it can be dangerous.
- On drawing the third deep breath, jack-knife at the waist, raise your legs vertically into the air and simultaneously draw yourself directly downwards. You don’t have to struggle against your buoyancy nearly as much when diving straight down.
- Equalise the pressure in your ears as you descend by squeezing your nose and blowing into it gently but firmly.
- When it’s within reach, grab the anchor with one hand. This will hold you ‘on station’ while you clip on the tripping line with your other hand. Avoid pressing against the bottom.
- Begin the ascent. Your ear pressure should equalise automatically on the way up
Tripping tips
- Take a snorkel diving course. Try BSAC and PADI
- Check with your doctor that there’s no medical reason why you shouldn’t go snorkel diving
- Never put your hands on anything you can’t see
- Never dive deeper than you know you can. The echo sounder will help here
- Use a carbine hook for speedy attachment of the tripping line
- Never attempt anchor retrieval when there’s tide running. Wait for slack water
- Never attempt to dive for the anchor if you are alone on board
Basic anchor retrieval equipment
- Shortie wetsuit (optional)
- Mask, snorkel (essential), fins (ideally)
- Carbine hook compatible with anchor attachment point
- Length of warp that fits the carbine hook
- Old shoes for mud/sand walking
- Basic harness (not a combination lifejacket)
The best boat anchor types for different types of cruising & their pros and cons
Rupert Holmes looks at the different anchor designs and how to choose the right one for your type of cruising

How to keep an easy-to-release anchor secure and prevent it from jiggling free
Trevor Martin shares his simple solution to keep his anchor secure when not in use

14 tips for single handed anchoring
Ben Meakins tries out some methods for dropping and recovering the anchor for singlehanded sailors in crowded anchorages

Anchoring a boat: Top tips from a scuba diving sailor
Drifting in a hot air balloon over variable terrain and needing to drop an anchor, you’d surely try to select…
Want to read more articles like this?

A subscription to Practical Boat Owner magazine costs around 40% less than the cover price.
Print and digital editions are available through Magazines Direct – where you can also find the latest deals.
PBO is packed with information to help you get the most from boat ownership – whether sail or power.
-
-
-
- Take your DIY skills to the next level with trusted advice on boat maintenance and repairs
- Impartial, in-depth gear reviews
- Practical cruising tips for making the most of your time afloat
-
-
Follow us on Facebook, Instagram, TikTok and Twitter