
Gilbert Park shares lessons learned from a messy black water pump reinstallation job that may have saved his boat during a French cruising holiday.
After a lovely week-long trip up the River Rance, I purposefully approached Port des Sablons, St Malo, on a hot, sunny day. I’d chosen this marina because its facilities included a black water pump out station.
The tank aboard Let’s Go, my Mitchell 28 Classique, had filled up while away and for some reason wouldn’t empty. When I used the pump, I could hear the motor whirr, but nothing was happening.
I suspected either an air leak on the tank side or that the impeller had disintegrated.
The black water pump and tank were located under the cockpit hatch, that could be lifted out of the way, exposing the set up. I had tried tightening the hoses with no result except for producing a water leak, seemingly from the tank to seacock hose.
Nothing else for it – but a trip to the fuel berth to fill up with diesel and empty the black water tank, plus a few good flushes.
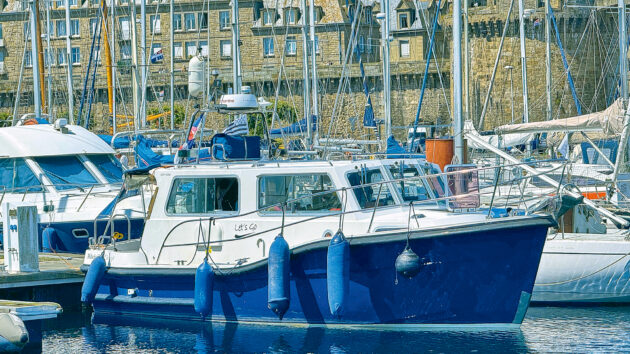
The Mitchell 28 Let’s Go in St Malo. Photo: Gilbert Park.
New black water pump
I spoke with Lee Sanitation about the problem and decided not to buy a replacement impeller but a whole new pump.
Jabsco does make a replacement macerator pump, but you need to be aware that it shouldn’t run dry (even though modern ones have dry protection) for a long period. They also make a toilet waste diaphragm pump that can run dry, however, it doesn’t chop up waste, toilet paper and the like. I know, from my motorhome experience, that motion breaks down the toilet waste anyway, so I plumped for the latter.
Having emptied the tank and washed it out as best I could, I put on my personal protective equipment – gloves, glasses and old clothes. I had a pile of rags and a bucket of hot water to clean up as I went.
Fiddly installation of the black water pump
Having made sure the seacock was off, I removed the hoses from the old pump with only a little struggle and not too much mess, keeping the hose clamp clips to reuse them.
Removing the old black water pump was trickier because the pump and its mounting screws were covered by the lip of the locker. I cut the wires, retaining as much of the existing wiring as possible.
Then it was time to install the new pump. The tubing size for the seacock connection was smaller than the outlet from the pump, so a short length of tubing with an adapter spigot was connected to the pump before it was reinstalled.
Screwing the pump to the bulkhead was difficult because of its weight and the vibration-reducing washers it sat on. In the end, I marked where the easiest screw was to go, made a pilot hole and put this screw in place.
I loosened the screw off, put the pump back in place and tightened up the screw just enough to hold the pump while I drilled a pilot hole and put a second screw in place. Then I removed both screws, put them on the pump with the anti-vibration washers and did these up, not too tightly.
It was then straightforward, if a little awkward, to attach the remaining two screws and take a breather!
The finished pump installation with the hose trimmed down. Photo: Gilbert Park.
The connectors
Next came the hoses. The tank-to-pump hose fitted without adjustment; the end of the hose just needed softening in an empty cardboard milk carton, filled with boiling water. Because of the water leak, just a short length was cut off the previous pump end of the other hose in case this was the source, but otherwise it was left at its original length. This looked untidy, so I cut it shorter later.
The electrical connections were straightforward crimps (although now I’d use a two-port clamp). Once all the hose clamps had been tightened, I added some water from a hosepipe to the tank, and switched the black water pump on – it all worked, no leaks, and the tank emptied.
It was only when I inspected the old pump that I realised what a lucky escape we’d had.
The top of the pump only had three dome nuts showing. I’d found the fourth and its stud when I first got the boat, but didn’t know what it was. Only one nut needed releasing with a spanner. The remaining two had sheared off with the stud and were already loose. Removing the top showed the impeller had lost some blades, but the chopper was undamaged.
Conclusion
The failure to work was because the top had loosened, allowing the air into the pump, so it couldn’t develop any suction. The leak came about because I’d further loosened the top when tightening the hose clamps. Three of the studs had completely corroded through their base and were not holding the cap in place.
Had the top been knocked or subject to vibration, the one stud holding the top in place might have snapped (its base was corroding) or allowed the top to rotate.
If the seacock was open (as usual), water would have poured in, forcing the pump top to open up even more with the result that the boat might have sunk.
Jabsco told me that this was an old model pump, and nowadays the studs are made of stainless steel. However, owners of older pumps might like to check theirs from time to time.
Lastly, I cleaned the tools using hot water with disinfectant. I dried them with rags and left them in the hot sun so the UV would kill off any other bugs.
Then it was time for a well-deserved shower!
Black water pump replacement: Step by step
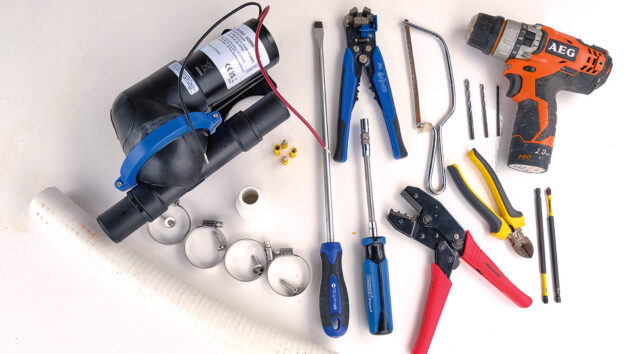
Photo: Gilbert Park.
Step 1: The new pump and fittings plus all the tools needed to install the pump, the hoses and make the electrical connections. (Notice the extra long crosshead screwdriver bits that made removing and replacing screws much easier).
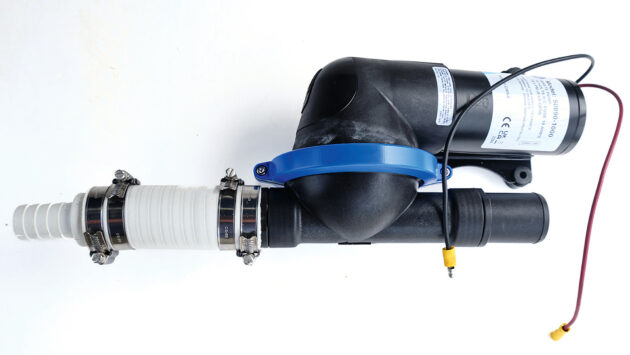
Photo: Gilbert Park.
Step 2: The pump ready for installation with its step-down adapter for the pump to seacock hose. The crimps are in place. NB: Today I’d use two port clamps instead of crimped on connections.
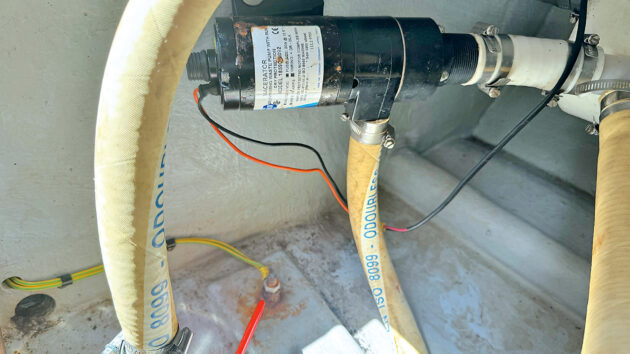
Photo: Gilbert Park.
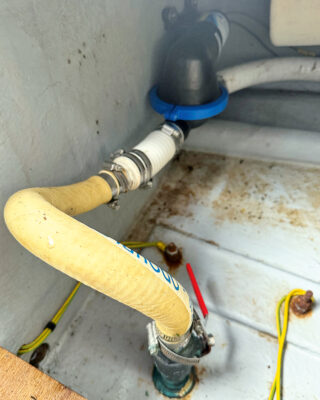
Step 3: The old pump in situ under the locker lip making access tricky. The long original hose from seacock to pump goes across the floor and loops around.
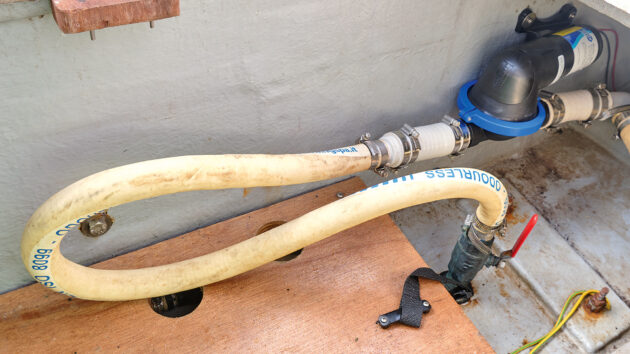
Photo: Gilbert Park.
Step 4: When the new pump was installed, the existing pump to seacock hose was not cut to a shorter length because it was unknown then where the leak was coming from. This fix would enable us to get home safely. Once home, it was shortened.
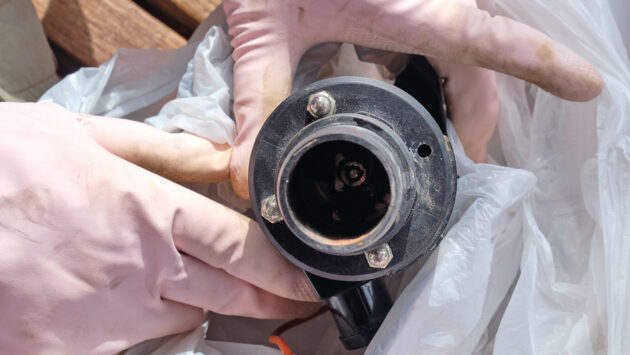
Photo: Gilbert Park.
Step 5: Only three dome-headed nuts were on the top of the old pump. The fourth had been found in the bilge but was unidentified when the boat was first bought. Only one nut required a spanner to undo it, the other two had sheared off.
Studs had corroded through their bases and were not holding the cap in place. Photo: Gilbert Park.
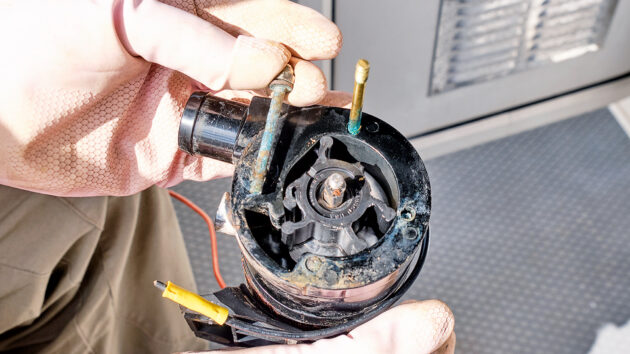
Step 6: The one brass stud remaining can be seen in the body of the pump. Notice its base is corroding. The three studs had sheared off some time before, as corrosion is seen with all the remains. The impeller has lost some of its blades.
The finished black water pump installation with the hose trimmed down. Photo: Gilbert Park.
Step 7: The finished pump installation with the hose trimmed down. This was done when safely back on the mooring in Emsworth.

Boat toilet troubleshooting: How to service a Jabsco toilet pump
Most modern mass produced yachts are fitted with Jabsco hand pumped boat toilets. They are cheap, simple and robust and…

How to change a water pump impeller
Stu Davies shows you how to check and replace an engine’s raw water pump impeller, and explains why it’s an…

“End the discharge of raw sewage” – Sports join forces to demand clean UK water
The issue of water pollution has led to seven UK organisations, including the Royal Yachting Association, to join forces as…
Want to read more practical articles like this?

A subscription to Practical Boat Owner magazine costs around 40% less than the cover price.
Print and digital editions are available through Magazines Direct – where you can also find the latest deals.
PBO is packed with information to help you get the most from boat ownership – whether sail or power.
-
-
-
- Take your DIY skills to the next level with trusted advice on boat maintenance and repairs
- Impartial, in-depth gear reviews
- Practical cruising tips for making the most of your time afloat
-
-
Follow us on Facebook, Instagram, TikTok and Twitter