
Andy Pag shares what he learned about bending acrylic while replacing the curved windows of his Lagoon 410.
We’d finally had enough of squinting through out boat’s saloon windows. It was time to learn how to bend acrylic so we could change them out ourselves.
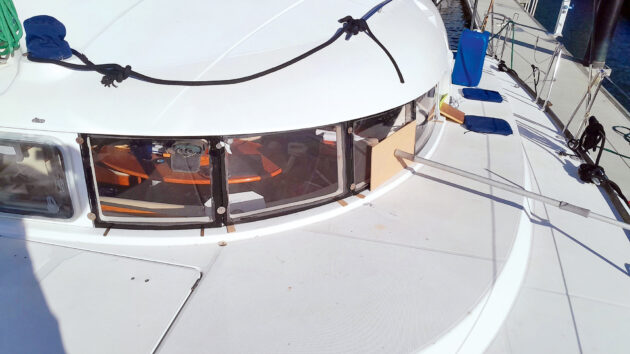
The saloon windows on our Lagoon 410, Cushla, have been crazed since we bought her, but listing her for sale made us realise just how ugly they’d become over the last four years, semi-circumnavigating from Europe to New Zealand.
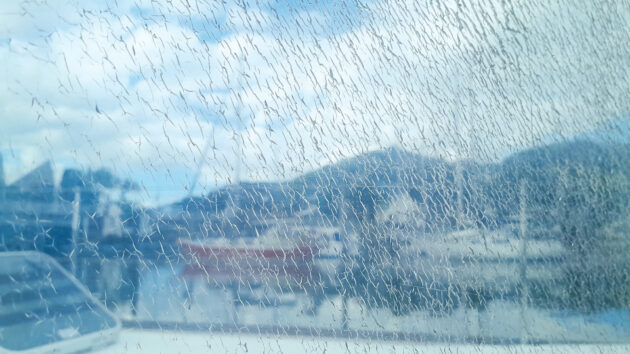
The old saloon windows were badly crazed, so Andy decided to replace them himself, which took some patience! Photo: Andy Pag.
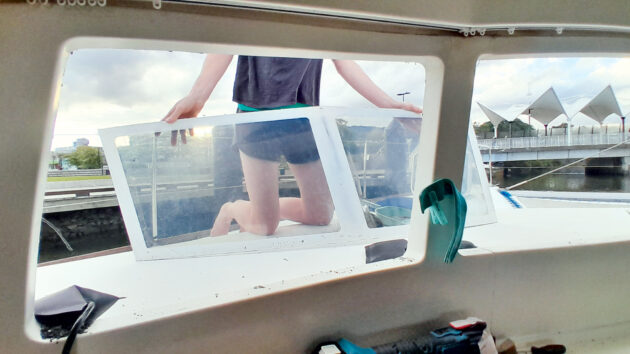
Luckily, we found ourselves with the time and access to materials to tackle the job. But the big challenge was that the saloon windows have a slight curve to them. Over the 700mm width, they bow out by 15mm.
My first thought was that this could probably be curved to shape in the frame and held in place by the strength of the adhesive.
A couple of sage boaters advised me that a heat gun would soften it into place, so buoyed with the confidence that this was a job we could do ourselves, we set to work.
How to bend acrylic: Our first attempts
I dug away some of the caulk between two of the panes with a blade and, from the inside, cut at the adhesive behind the pane with an oscillating tool, just enough to free up a corner so I could get a pair of calipers around it and measure the thickness; 8mm.
I could now order the acrylic I needed while the boat was still waterproof, but 8mm is pretty meaty and although the adhesive might be strong enough to hold it in an arc, without pre-bending the saloon windows it would create internal stresses that would cause the crazing to return prematurely, and put extra pressure on the adhesive bond.
I felt the new panes would need to be bent.
I ordered a full sheet of acrylic, 1.2m by 2.4m, and patterned the panes I wanted to replace using out-of-date charts. The weight of the paper makes it an ideal patterning material, and a paper pattern is the only way to measure a curved window onto a flat new sheet of acrylic.
I cut out the panes deliberately a little oversized with my cheap jigsaw, which has a tendency to veer to the right unless you’re careful. I’d tidy up the edges with a router after they’d been curved because the heating process shrinks the acrylic by 1-2%, enough that it would make the gap between panes a little too wide if they were trimmed before bending.
My first attempt at figuring out how to bend acrylic sheets involved clamping one side of the window to the frame, applying pressure to bend the pane as I wafted a heat gun over it. To bend, acrylic needs to get to around 150-160°C.
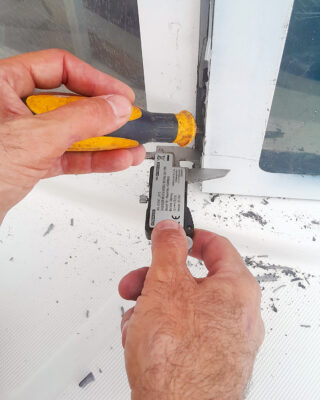
The adhesive was cut away, and one of the window panels prised gently open enough to get a pair of calipers in to measure thickness. Photo: Andy Pag.
Using an infrared thermometer, I could see I was barely able to reach 120°C.
Attempt number two involved my wife, Julie, and I attacking the pane with a heat gun each, one on either side, and while this worked, it was only able to soften it in patches, resulting in a warped pane that gave a hall of mirrors effect and a pretty wonky fit.

Old charts and magazines were ideal for making the templates. Photo: Andy Pag.
Bend in a former
For attempt number three, I decided that it would be best to bend the sheets off the boat, and for that, I’d need to build a former. I measured the deflection of the frame by laying a straight edge alongside it flush against the middle.
I then measured the gap at the ends, and midway from the ends to the middle. The gap went from 15mm to 5mm to zero to 5mm to 15mm, at 175mm spacings. Thankfully, the curve in each of the panes was the same, so one former would do for all the panes.
I used some rigid ply to make the former and nailed on multiple strips of 5mm thick MDF to get the right height at the right spacing, and then nailed a sheet of thin, pliable MDF over them so it adopted the curve needed.
The challenge now was to heat the panes up to the right temperature.
A friend offered their large barbecue and I made a supporting plate to rest the sheet on, covered in aluminium foil. In terms of curvature, this worked perfectly. The test pane came out soft and draped over the former like a blanket. As it cooled, it sprang back a little, though, so in round two, we used another thin sheet of MDF on top of the pane, weighted down with dive weights.
Cleaning up the edges of the frames. Photo: Andy Pag.
The pane fit snugly to the frame, but the success was fleeting. As I cleaned up the acrylic, I noticed lots of tiny bubbles and dimples on the surface. It was the shadow the pane created that alerted me to them, but once I’d seen them, I couldn’t bring myself to fit the test pane.
In the unregulated temperature of the barbecue patches of the acrylic had overheated, and the internal moisture had caused the bubbles. The dimples, which cast a sort of black-hole shadow, were caused, I would later learn, by flecks of dirt sitting on the pane as it was heated.
Round four was courtesy of a local glass-blowing factory. The owner let me use their kiln during downtime. But the thermostat wasn’t so reliable at the comparatively low temperatures we needed.
By now, I’d discovered a PDF online manual called ‘Forming Plexiglass’, published by Plexiglass.de, a brand of acrylic sheeting, which explains in excruciating detail how to bend acrylic sheeting and realised that tight temperature control, within 10°C, was essential. The material softens at around 150°C, but can bubble, or discolour at anything much above 160°C.
The air in a glass-blowing kiln is still, but the manual recommends airflow over the work to ensure even heating of the acrylic. The still air meant part of the sheet near the heated walls got too hot, while near the door it was cooler, resulting in an uneven curve.
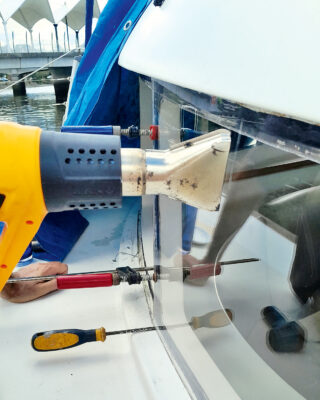
A heat gun wasn’t hot enough to bend the acrylic sheet effectively. Photo: Andy Pag.
Getting even heating also reduces internal stresses in the pane, which over time would lead to premature crazing or stress fractures.
I started scouring Facebook listings for used pizza ovens and even domestic ovens. I thought I might be able to build a bolt-on insulated box and use the oven fan to ensure even heating, but I couldn’t find any suitable insulation, and didn’t want to start a fire on the pontoon.
If I’d had more time, I might have pursued this idea, but by now we’d been without half the saloon windows for a week, and were thinking our only option might be to put the old windows back in.
A solution at last!
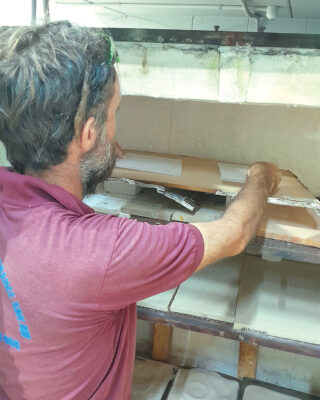
We started ringing around acrylic fabricators. Most had a lead time of two to four weeks and were reluctant to quote for a bespoke job. But we found one that would let us use their oven. Having the former and the precut panes kept the cost down, and I made a second former so the work could go quicker and save on the hourly rate.
Working with the old timer at the fabricators, I learned a few more tricks.
When first heated, acrylic sheet will warp upwards, like a dying gasp, before settling back to lying limp. Don’t be tempted to try to form it until it’s back to limp, as the heat won’t have permeated uniformly through it. Don’t leave it in the heat for too long either, as it can discolour. Ideally, the piece needs to hang in the airflow of the oven so it gets heat from both sides. Allow about four minutes heating time per millimetre of thickness.
The old saloon windows removed. Photo: Andy Pag.
A temperature of 150°C is fine for drape forming subtle curves like this, but more complicated shapes should be done at 160°C. I’d made a male former, but a female former would have been better. Apparently, a blanket over the cooling former will help with the clarity of the pane by slowing the cooling process down.
And finally, cleanliness is very important; any little speck of dirt on the surface while it heats can cause a dimple swirl, which had dogged our previous efforts. Peeling off the protective plastic film creates static electricity, which attracts every speck of dust in range.
Wiping the pane down with mineral oil before putting it in the oven removes the static and any debris. Finally, laying it on
a cotton sheet in the oven and felt on the former prevents it from adopting imperfections in the contact surfaces. After four hours of work, we had all our panes curved and ready to fit.
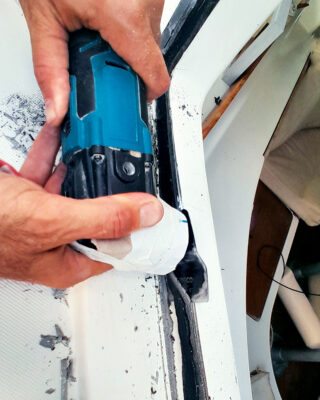
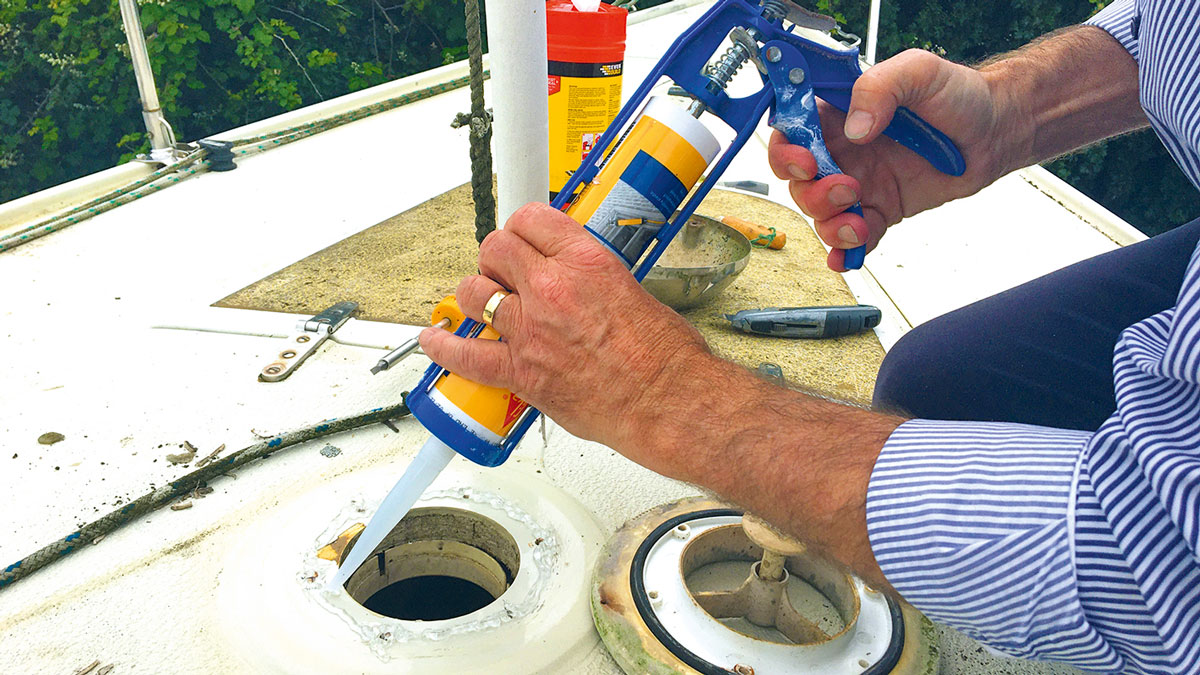
For adhesive, I used Sika 295UV, which requires Sika’s pricey 209d primer on the acrylic and the glassfibre frame. The primer is a nasty, messy product to use.
It flashes off in seconds, and is best applied with a piece of foam. Use gloves, and mask everything in the vicinity as it will stain any gel coat it dribbles onto.
Using a glass-blowing kiln didn’t work as it was impossible to get an even temperature. Photo: Andy Pag.
I used some sponge tape around the edge of the frame to keep the pane at a small gap from the surface. This results in an adhesive bead with a bit of depth to it, so it’s more resistant to flexing and can absorb movement in the boat and thermal expansion differences.
To hold the panes in place while the adhesive cured I used some split clothes pegs as wedges and spacers to create even gaps top and bottom, and clamped them for 24 hours with temporarily screws between the panes with large washers to ensure even transition between panes.
Once the adhesive had cured, I painted over the glued sections, applying the horrible primer first and polyurethane paint second. The finish wasn’t great because
I didn’t want to add thinner to the paint as I worried it might attack the acrylic. The job was finished by sealing the gap between the panes with a UV-resistant sealant.
How to bend acrylic step by step
Step 1: Confirm the thickness of your current window pane and order the replacement acrylic sheet.
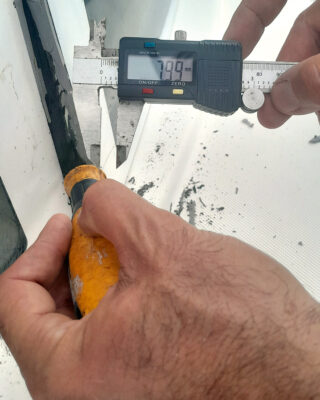
Photo: Andy Pag.
Step 2: When the acrylic arrives, cut out the old windows using a reciprocating tool, blade and wedge.
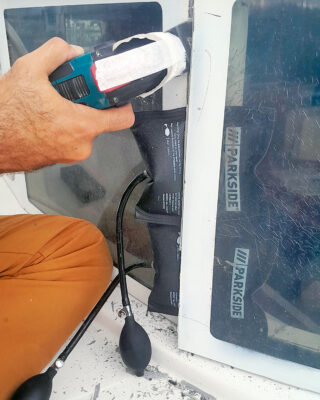
Photo: Andy Pag.
Step 3: Use paper (magazines or old charts) or thin card to pattern the shape of the old pane.
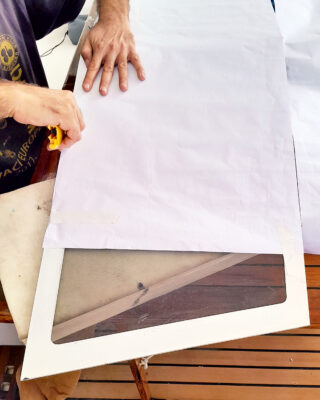
Photo: Andy Pag.
Step 4: Use the pattern to cut out the replacement pane, making sure you leave it slightly oversized.
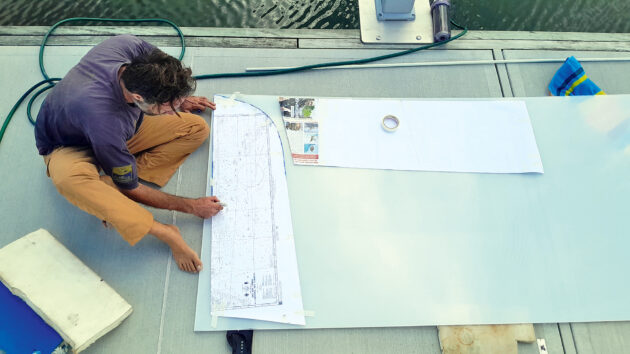
Photo: Andy Pag.
Step 5: Use measurements from the frame to build a former from thin plywood with the same curve.
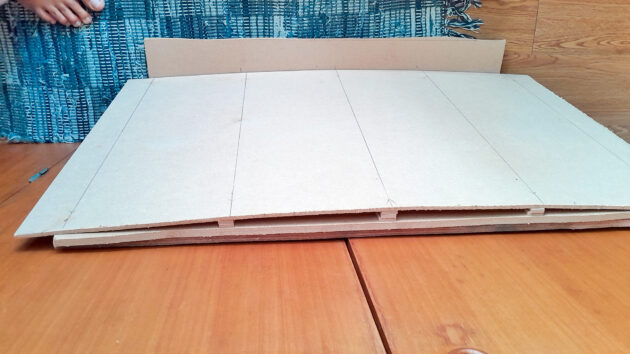
Photo: Andy Pag.
Step 6: Don’t destroy your expensive acrylic sheet by attempting to heat and bend it in a glass-blowing kiln or a barbecue.
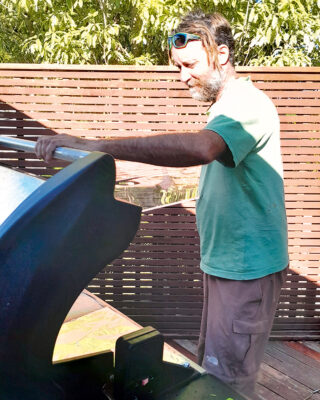
Photo: Andy Pag.
Step 7: If you can, build an oven extension box with foil-backed insulation, get access to a pizza oven, or ask an acrylic fabricator for access to their commercial oven.

Photo: Andy Pag.
Step 8: Clean the pane with mineral spirit (turpentine) and lay it on a clean cotton fabric or felt, ready for the oven.
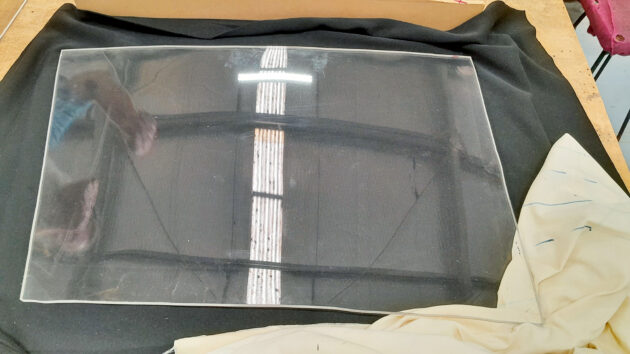
Photo: Andy Pag.
Step 9: Put the pane in the preheated air-assisted oven at 150-160°C for four minutes per millimetre of thickness.
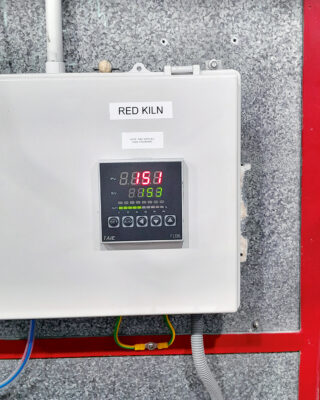
Photo: Andy Pag.
Step 10: Drape the now limp pane over the former, clamp it in place, and allow it to cool slowly.
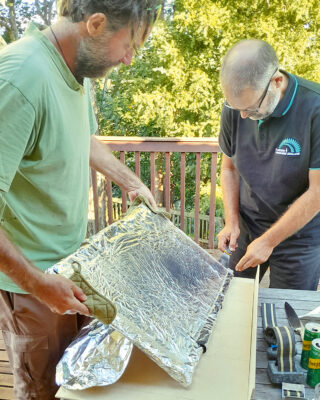
Photo: Andy Pag.
Step 11: Clamp the new curved pane to the old and use a router to trim the edges for an exact fit.
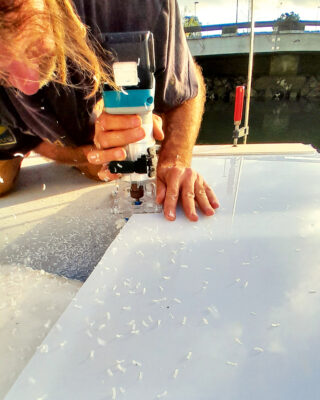
Photo: Andy Pag.
Step 12: Fitting the new panes while adhesive cures is relatively painless with spacers, clamps (some ingenuity may be required) or temporary screws and large washers.
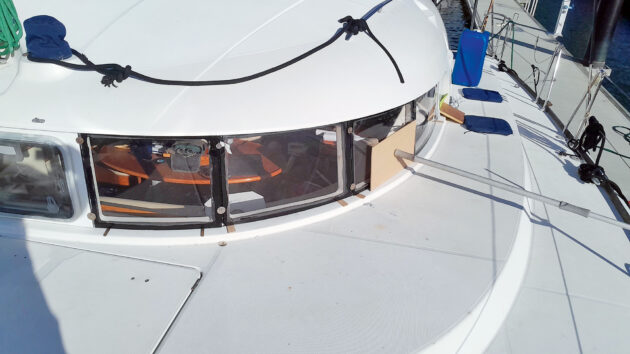
Photo: Andy Pag.
Acrylic vs Polycarbonate
|
Acrylic |
Polycarbonate |
|
Aka: Perspex, Plexiglass, Polymethyl methacrylate, PMMA |
Aka: Lexan, Makrolon |
|
Pros: Cheaper, UV resistant. |
Pros: More impact resistant and rigid |
|
Used in: hatches and small to medium windows (up to 1m across) |
Used in: large window panes with a UV protective layer |
Andy Pag is a former engineer and journalist. He and his wife, Julie lived aboard their Lagoon 410, Cushla Na Mara, for four years, sailing the catamaran from Greece to New Zealand.
Replacing Jeanneau Sun Odyssey 42 DS windows
Phil Symonds tackles the problem of aged bonding on the front windows of his 2008-model yacht to maintain value and…
Best marine sealants and adhesives for boat jobs
With help from adhesive and sealant expert Laurie Brebner, PBO’s Ali Wood explains which works best for different jobs on…

Bonding marine windows back in: the best gasket sealant
PBO reader Nicholas Phillips wants advice on the best gasket sealant for bonding his marine windows. Our expert Sven Petersen…
Want to read more articles like this one on how to bend acrylic?

A subscription to Practical Boat Owner magazine costs around 40% less than the cover price.
Print and digital editions are available through Magazines Direct – where you can also find the latest deals.
PBO is packed with information to help you get the most from boat ownership – whether sail or power.
-
-
-
- Take your DIY skills to the next level with trusted advice on boat maintenance and repairs
- Impartial, in-depth gear reviews
- Practical cruising tips for making the most of your time afloat
-
-
Follow us on Facebook, Instagram, TikTok and Twitter