
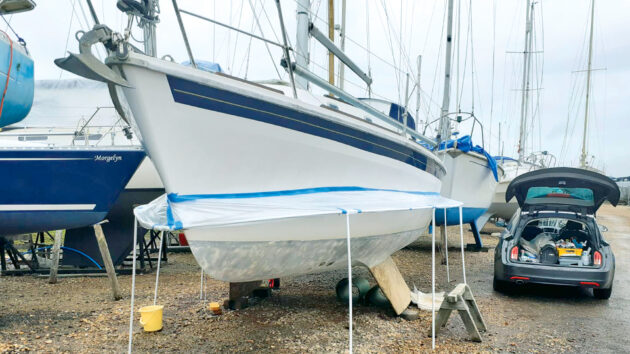
Neil Fuller keeps his boat dry while antifouling with a simple DIY hull skirt made of waste pipe, fittings, and a polythelene dust sheet.
Ever thought of making a hull skirt?
Getting fed up with the yearly grind and expense of antifouling Koto’s bottom I decided to switch over to Coppercoat.
Doing so would cost a small fortune up front but I reckoned I’d break even after five years, and not having to spend hours and hours on my back each year would be priceless.
Given the expense I wanted to make sure I made the best chance of applying the Coppercoat correctly. To do so would mean sandblasting off the old coatings back to the clean gel coat, and then re-priming.
When I first bought Koto I’d applied anti-foul primer, but as it went on it rained unexpectedly. Over the years this caused issues – each time the hull was pressure washed, various bits of this layer delaminated, taking the antifouling with it.
The last thing I wanted was for this to happen again with my expensive Coppercoat. I sat down to devise a way of keeping rain showers at bay.
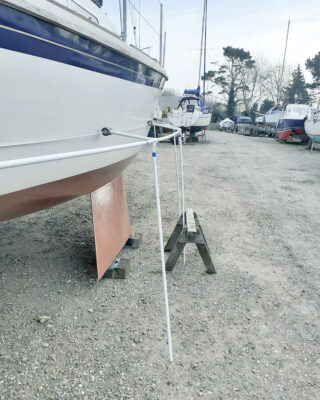
Making my hull skirt
I’m a great fan of Floplast 21.5mm overflow waste pipe and fittings, having used them to make an awning frame and a couple of solar panel mounts in the past. With T-pieces and 90° and 135° elbows, you can make a variety of structures.
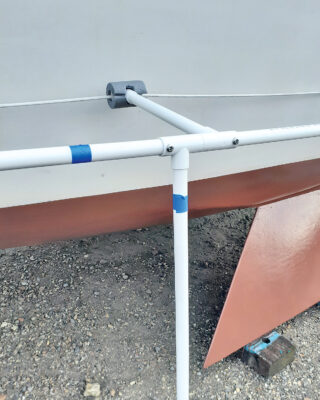
Detail showing how the T-joint is secured to the hull using rope. Photo: Neil Fuller.
The pipe comes in 3m lengths so I decided that for Koto I’d work with 1.5m lengths for the uprights and horizontal stringers and 30cm for the hull stand-offs, giving minimal wastage.
Calculating all the material needed – 15 lengths of pipe, bends, tees, couplings, solvent weld, plastic dust sheet roll and masking tape – came to a grand total of just under £90.
I first cut the 3m lengths into 24 x 1.5m lengths (I’d leave cutting the stern stringers until I knew what I’d need once the rest was assembled).
I made up the 10 uprights running down the boat sides, each from three T-pieces, a 30cm stand-off, and a 1.5m length of tube.
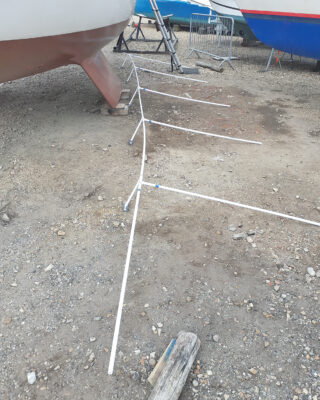
Skirt frame for one side assembled on the ground. Photo: Neil Fuller.
These were all solvent welded together, a small length of tube joining the T-pieces into which the stringers would go. I used a small bit of pipe insulation round the T-piece that would rest against the hull.
I then made up the bow and stern uprights from various bends and T-pieces.
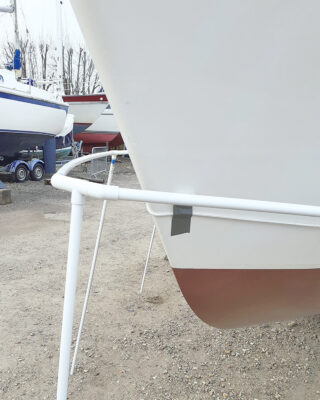
Detail of the frame at the bow. Photo: Neil Fuller.
Assembling the hull skirt
I assembled the first side on the floor and, with the help of my wife, Karen, lifted it up to rest against the hull, using some masking tape to initially hold it in place.
I next fitted the bow upright and, working towards the stern from there, built the frame directly down the other side, stringer by upright to the stern.
Rope secures the frame around the hull. Photo: Neil Fuller.
At this stage, the skirt is pretty well self-supporting if a little wobbly. To tie it to the hull I threaded rope through each of the T-pieces touching the hull then tied it tight, securing the frame to the hull.
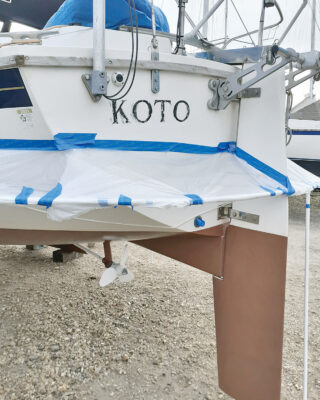
Polythene to keep the rain out
The polythene dust sheet roll I used comes folded on a roll 50cm wide. I left it folded (it’s very thin) and with Karen holding and unwinding the roll I used the masking tape to attach one edge to the hull, ensuring the polythene will then stretch to reach the stringers as you proceed as the hull shape will require the odd nip and tuck.
Skirt around the transom
and rudder. Photo: Neil Fuller
If I were to do it again I think I’d consider making the stand offs a little longer, and maybe use a heavier-duty polythene sheet.
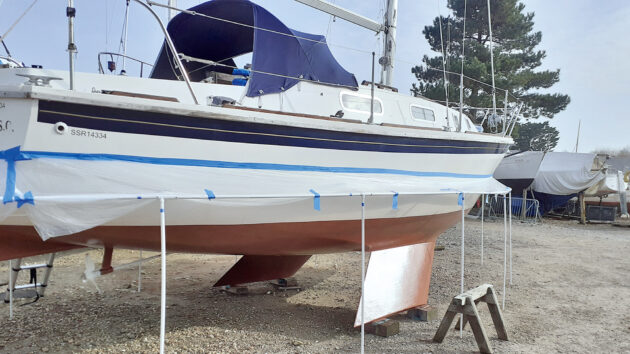
The end result – Coppercoat applied without getting wet. Photo: Neil Fuller.
This skirt actually worked very well.
It did rain overnight between coats of primer and the hull was kept dry, and the skirt stopped overnight dew from getting to the hull too. It withstood 30-knot gusts of wind without issue, and it doesn’t get in the way of painting!
Traditional vs Coppercoat antifoul: reader test
Nick and Wendy Tyler apply both coatings to their Moody 37. But which one will last the distance?

Is your antifoul choice contributing to Global warming?
Visit a boatyard now and you’ll be greeted by the unpleasant smell of solvents. Known as VOCs (Volatile Organic Compounds),…
Want to read more articles like this?

A subscription to Practical Boat Owner magazine costs around 40% less than the cover price.
Print and digital editions are available through Magazines Direct – where you can also find the latest deals.
PBO is packed with information to help you get the most from boat ownership – whether sail or power.
-
-
-
- Take your DIY skills to the next level with trusted advice on boat maintenance and repairs
- Impartial, in-depth gear reviews
- Practical cruising tips for making the most of your time afloat
-
-
Follow us on Facebook, Instagram, TikTok and Twitter