
Roger Hughes shares his new technique for making a smooth, continuous rope splice in double-braided line
Ropemakers describe various methods in their manuals and online videos about how to make a continuous rope splice, but nearly all result in a splice thicker than the rest of the rope.
On my 50ft brigantine schooner Britannia, the boat’s furling line layout is such that a splice would not pass through the jaws of the winding drums or the rope clutches.
To be able to use a continuous loop, the splice needed to be no thicker than the diameter of the rope, and needless to say, it also had to be very strong.
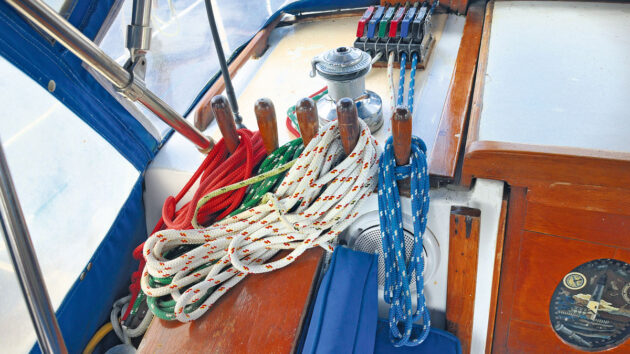
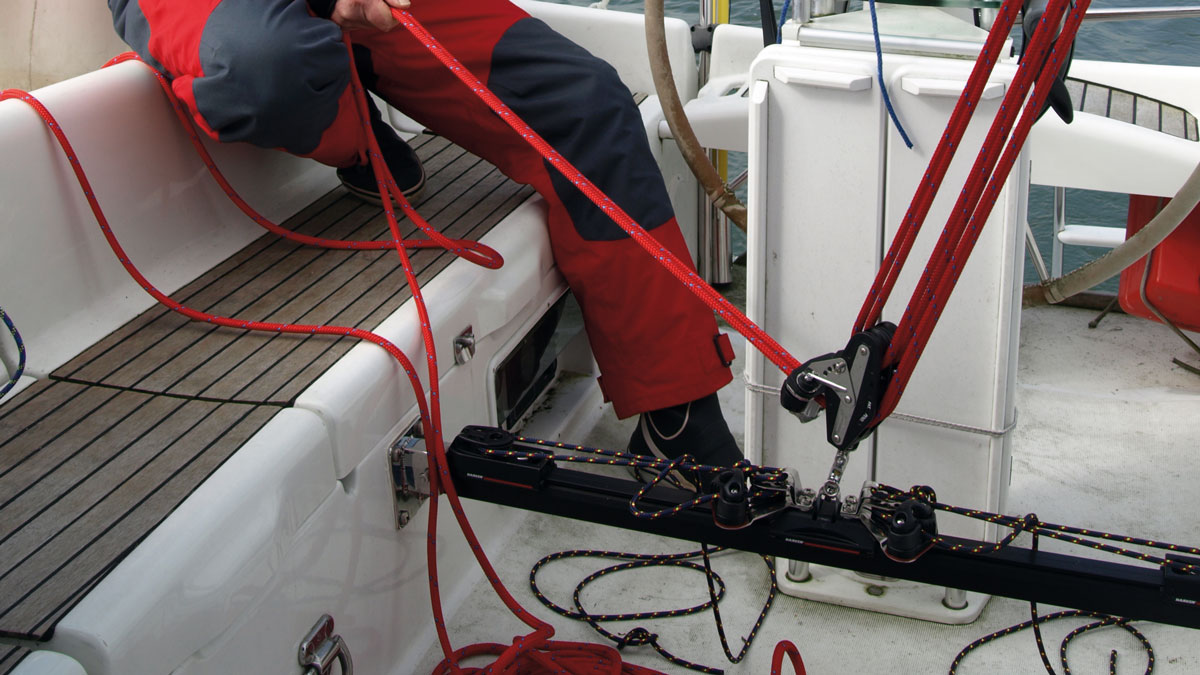
There’s much less clutter on Britannia’s rope deck after the lines were made into continuous loops. Credit: Roger Hughes
After a lot of experimentation and testing, I arrived at a method to splice two ends of a double-braided line together, resulting in a uniform thickness the same as the rope, which has been officially tested to have great strength.
Nearly all splices result in a weakening of the rope, so this should be considered when deciding where to position a continuous line splice.
All sail furlers that use a rope passing through a winding mechanism (whether a continuous loop or not) have one side of the line – usually the furling line – that needs more hauling than the other side, so it’s logical to position a continuous loop splice on the least loaded side.
Tools for making a continuous rope splice
The following items were used to make the continuous rope splice:
- A sharp sewing needle and whipping twine: Dyneema whipping twine is best for this operation since it is considerably stronger than regular twine and adds great strength to this type of splice.
- A box cutter, (Stanley knife), with a sharp new blade: Dyneema cannot be cut with scissors.
- A scalpel-type knife (X-ACTO), with a new, sharp-pointed blade for stripping out individual rope strands.
- A roll of ¾in (20mm) masking tape to stop the rope ends from fraying, and a type that does not leave a glue residue on the rope like electrician’s tape.
- A heat gun to heat-shrink the tubing.
- A gas lighter to weld the two ends of the rope together.
- A 1½in (40mm) length of heat shrink tubing, sometimes called heat shrink sleeve (UK stockists include www.heatshrinkcompany.co.uk and www.ropelocker.co.uk).
If a splice has to unavoidably pass through sheaves, blocks, or round a winch as mine did, do not use heat-shrink with adhesive in the tube because it sets rigid and inflexible and causes problems as it passes over or through blocks and sheaves. Use non-adhesive heat shrink instead, which is more flexible.
However, if the splice can be positioned so it does not pass through any restrictions, like clutches, then adhesive heat-shrink tubing can be used since it is stronger and also waterproof.
Whichever type is used, it should be the correct size to properly shrink on the rope.
Making the continuous rope splice
Before making a continuous loop splice, the rope must first be roved through all sheaves, pulleys, and clutches, because it cannot be threaded through afterwards, since it will have no ends!
A note on rope terminology: the cover is the complete outer weave of the rope. The core is the complete inner weave of the rope. A strand is one weave of the cover, and usually there are 24 strands on a double-braided cover in 12 sets of two.
Like most technical instructions, this splice is more complicated to describe than to actually do.
First, thoroughly read the instructions to envisage each operation; it would also be beneficial to make a trial splice on a length of spare rope of the same size.
Perform each stage slowly and methodically, and the result will be a perfect continuous rope loop of great strength.
Simply put, the splice is formed by smoothly inter-connecting both ends of the core and cover, spaced separately.
How to create the smooth, strong, continuous rope splice: step-by-step

Credit: Roger Hughes
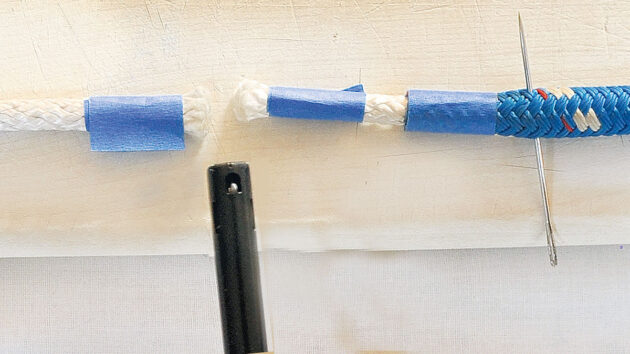
1. Loosely tape both ends of the cover to stop them from fraying, then slide a 1½in (40mm) length of heat shrink tube down the rope.

Credit: Roger Hughes
2. On one rope end, milk the cover back from the core to expose about 40 times the diameter of the rope – for the ⅜in (10mm)rope shown, this is 15in (400mm) – then tape the core at that point. Prevent the milked cover from sliding back over the core by pushing a needle through the rope. Then, ½in (12mm) from the tape, cut the core off.

Credit: Roger Hughes
3. On the other end of the rope, first make sure there is no slack in the cover, then tape the end, but 1in (25mm) shorter than the length of the core that has just been cut off.
Credit: Roger Hughes
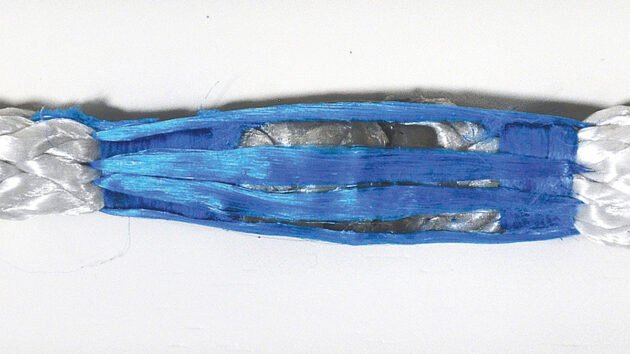
4. Using a tiny Phillips screwdriver, lift a strand of the cover near the tape, then insert a sharp scalpel blade into the opening, and sever the strand. Locate the same strand an inch further down the weave and ease it back through the cover out of the way. Continue doing this until the core is exposed enough to be eased completely out of the cover. Be very careful not to nick the core with the knife.

Credit: Roger Hughes
5. Having extracted the core from the cover, cut the cover off completely and clean up the frayed ends flush with its tape. Tape the core ½in (12mm) from its end. This will give one rope end with no core and one with no cover.
Credit: Roger Hughes
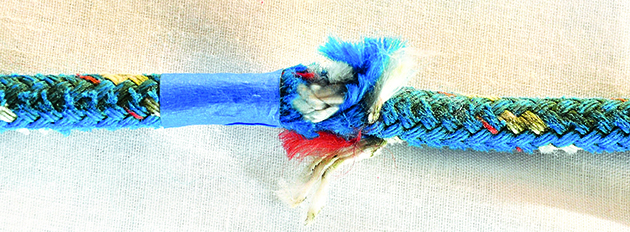
6. Position both cores about ½in (12mm) apart, then, using the gas lighter, heat the ends simultaneously until they both melt, then weld them together. With a rubber-gloved finger, roll the weld back and forth to make a circular joint the same thickness as the core – be aware that the joint will be very hot.

Credit: Roger Hughes
The photo (immediately above) shows the finished weld between the two core ends.
Credit: Roger Hughes
7. Starting ½in (12mm) from the weld, bend a tight ½in wide whipping on either side and leave enough on the whipping twine to make a series of stitches from the outside edge of one whipping, straight across the weld and through the core outside edge on the other side, and pull taught – but not too much to deform the joint. Repeat this five times, backwards and forwards, evenly spaced around the core. This whipping technique carries most of the load of the core splice, yet remains flexible as it passes through sheaves and blocks. This completes the core splice (above).
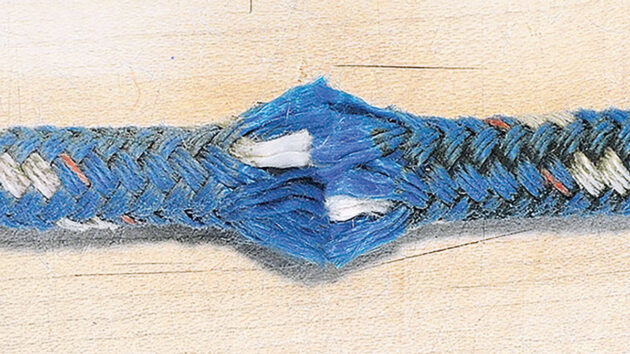
Credit: Roger Hughes
8. Remove the tapes and milk the outer covers together over the core splice until they meet, then place a tight binding of tape over the joint. If the two covers do not meet, unfortunately, it will be necessary to shorten the core splice. Unpick it completely, then cut the weld out by the distance the covers were apart, plus ½in. Re-weld and re-whip the core, which will bring the covers together.

Credit: Roger Hughes
9. Bend a very tight 1in (25mm) wide whipping over the cover joint, then lock-stitch from the outer edge of the whipping through the cover and across the centre, and through the cover on the other side. Make five passes evenly around and through the rope. This lock stitches the cover to the core and greatly reinforces the cover joint.
Credit: Roger Hughes
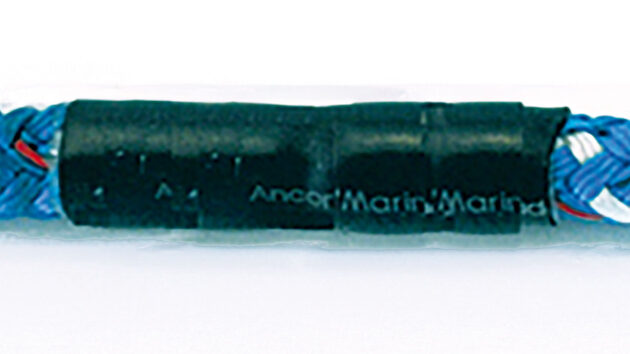
10. Finally, slide the heat shrink tube over the cover join and, using a heat gun, shrink it to seal the join while being extra careful not to damage the surrounding rope cover. You now have a continuously looped line with strong splices in both the core and cover, but spaced wide enough apart to act separately.
Strength testing
As with any splice, it would be reassuring to know its strength relative to the tensile strength of the rest of the rope.
Tensile strength is the load at which a new rope can be expected to break.
As I’m based in the US, this is done on American Society for Testing Materials (ASTM) rope testing equipment (In the UK, this type of testing is carried out by companies like Marlow Ropes).

This very powerful hydraulic machine for stretching any rope to its breaking point was used to test the strength of Roger’s improved splice. Credit: Roger Hughes
The ⅜in (10mm) double-braided polyethylene line used on the splice is rated to have a tensile strength of between 3,000lb and 3,800lb (1,360-1,725kg), depending on which manufacturer’s tables you read.
One of my continuous splices was tested by Miami Cordage Inc, a Florida commercial rope maker that supplies the US Navy.
It has a 40ft-long hydraulic testing rig that can stretch any rope to destruction, including the massive hawsers used to moor aircraft carriers.
My 10ft-long piece of string with the splice in the middle was stretched until it eventually snapped at 2,031lb (921kg).
This is far more than the torque required to rotate the drivers on my two sails, and the splices have performed flawlessly thus far.
Making continuous loops has greatly simplified the operation of the sails, and there is now a much less cluttered cockpit.
Warning: it is inadvisable to use any type of spliced rope for personal safety attachments, like to a bosun’s chair or safety harness.
This is because any buried splice cannot be inspected internally. It is far safer to tie these lines using an appropriate knot.

7 sailing knots every boater should know
Ben Lowings shares how to tie the most useful sailing knots

Can I trust this boat mooring?
Most sailors use traditional moorings without knowing about their condition or how they are made. Ben Sutcliffe-Davies explains
How to fit a removable mainsheet track
When your boat’s mainsheet arrangement doesn’t quite do the job it’s not difficult to improve upon it yourself. Here’s how…
The Adjustable Fender Mate for easier mooring
The Adjustable Fender Mate aims to eliminate the need for knots when setting your fenders. Katy Stickland puts it to…
Want to read more practical articles like this?
A subscription to Practical Boat Owner magazine costs around 40% less than the cover price.
Print and digital editions are available through Magazines Direct – where you can also find the latest deals.
PBO is packed with information to help you get the most from boat ownership – whether sail or power.
-
-
-
- Take your DIY skills to the next level with trusted advice on boat maintenance and repairs
- Impartial, in-depth gear reviews
- Practical cruising tips for making the most of your time afloat
-
-
Follow us on Facebook, Instagram, TikTok and Twitter