
Don’t be a slave to varnish. Louise Ras explains how she transitioned to wood oil instead
With exterior fittings of wood – or worse, if your boat’s entirely made of wood – chances are weekends with clear skies and light winds are more often spent varnishing than sailing, writes Louise Ras.
And if you start chatting with neighbours and friends, they’ll all have their favourite brands, processes, and tips and tricks for the glossiest finish.
But no matter how good your preparation, application, and dedication, one day the inevitable will happen: cracked varnish!
This is one of the most frustrating parts of an otherwise satisfying art.

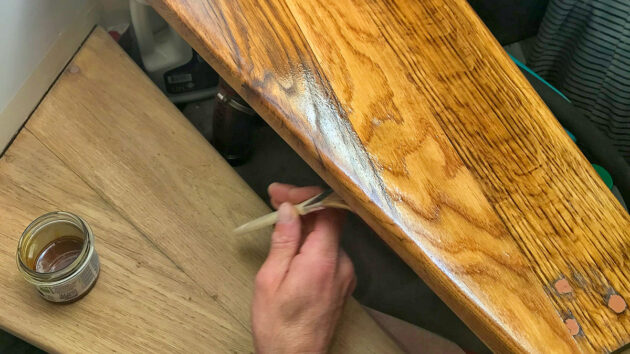
Louise used SATOléo Terrasse to oil the wood on Hirondelle. Credit: Louise Ras
Our 12m/39ft schooner Hirondelle was built in the 1990s with wood strip-planking, so it has plenty of exterior woods that need to be cared for.
During our refit, we used a wood stain followed by Epifanes’ marine varnish. The deep colour and glossy finish looked great.
But after four years of sailing, living aboard, and struggling to keep up, we began to open up to new ideas and alternatives to varnish.
Wood oil as an alternative
One day, while blowing off some steam, complaining that I was having a tough time maintaining impeccable varnish, a neighbour suggested we try wood oil instead.
We’d previously heard about oiling wood (some good reviews but mostly bad) and were a little sceptical.

Louise first used wood stain and marine varnish on Hirondelle, but found it difficult to keep on top of the maintenance. Credit: Louise Ras
How long does it last? Will we need to apply it more often? What happens if we can’t keep up? Won’t the wood darken? Does it really protect the wood? Does it smell bad? Will it come off when it rains? Is it easy to apply?
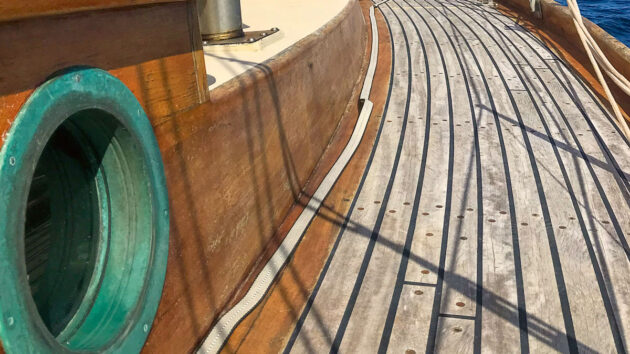
We’d decided against saturating our iroko deck with teak oil, preferring to let it become grey from UV and salt water.
Several shipwrights strongly encouraged us to keep it natural and use salt water to protect the wood.
Yet some of the same shipwrights had also recommended using natural oils to maintain our interior wood; we were curious.
First application of wood oil
Our questions piled up, but most of the responses were encouraging.
We found shipwrights who praised the more natural, traditional aspect of oil, and experienced sailors and fishermen who loved the ease of application.
We saw a few boats that looked fine after years of wood oil.
They encouraged us to take the leap, or at least test it on a small surface, especially as our boat has plenty of iroko and oak, both known to contain high levels of tannins.
So, when we needed to do maintenance on our oak companionway, we decided it was time.
We stripped the varnish off the hatch and steps, sanded everything smooth, and applied our first coat of wood oil.

The companionway had to be sanded after the varnish was removed. Credit: Louise Ras
The instructions were straightforward: Shake well. Apply oil on a clean, sanded surface using a cloth saturated in oil. Let it sit in the shade for 20 minutes. Rub off excess with a clean cloth. Then, safely dispose of the oily rags. Fire service advice is to either dry out oily rags in a well-ventilated area or to soak them in water for several days before disposal. Make sure the old rags are sealed in a metal container which has a tight-fitting lid and that the container is filled with water.
After 12 hours, apply a second coat. Then, apply as needed. Dry to the touch after 12 hours. Dry to core after one week. Use cotton rags and a low-rimmed container.
Stuck in our habits, we decided to apply the oil with a paintbrush and then let it sit before wiping off the excess oil with a cloth. This worked out well.
We repeated the same process for the second coat the next day, and for the third coat a few days later. The result was a matte, natural-looking finish that really highlighted the oak’s veins and character.
Two months later, we were very happy with the result. It looked good, and the steps were not slippery when wet.
We decided to take the experiment to the next level, oiling the very exposed cabin trunk sides.
The old, cracked varnish on Hirondelle. Credit: Louise Ras
Our varnish wasn’t looking good. We had just reached Scotland and knew that the tricky weather made it easier to oil than to varnish.
Varnish requires good weather with no risk of rain for at least 12 hours after application, whereas the oil is more lenient, tolerating light rain just a few hours after application.
As soon as the weather was good enough – cloudy with rare showers – we stripped off the old cracked varnish and sanded the wood with 240-grit sandpaper.
We then vacuumed the surface and cleaned it with an acetone-soaked rag. We then applied the oil using the same technique as before.
Whenever the sun came out a bit too brightly, we quickly rubbed off the excess, not knowing what impact it would have on the wood.
During the night, there were a few showers. The next morning, we were happy to see the rain had not left any marks.
The result was a deep, natural-looking finish that contrasted beautifully with the grey iroko deck.
More oil later
A few months later, following instructions, we applied more wood oil. The goal is to let the oil seep deeply into the wood to form a protective barrier.
This means that, at first, you’ll regularly need to apply more. As soon as the wood is looking a bit dry, it’s time for another coat.

Oil really brings out the character of the wood on the companionway hatch. Credit: Louise Ras
After a few applications, the wood starts to become saturated, increasing the timespan between coats.
Our oiled woods were still looking nice after six months, although a bit dry and much darker than before. It was time for more oil!
Next step preparation
This was easier than the first time; no sanding was involved! Some warm, soapy water and a sponge were all we needed to clean the wood thoroughly.

The oiled iroko cabin sides, a few days after application. Credit: Louise Ras
We quickly realised just how filthy it was. The water was black after just a few minutes, so we had to change it more times than we’d like to admit.
Apparently, vigorous cleaning gets rid of the dark, blackish tint.
Second step application
Before applying the wood oil, we shook the bottle for at least a minute, as per the instructions.
This time we applied the oil with a cloth, as recommended in the technical instructions.

Close-up of oiled oak on the boat after it has been left for a few months. Credit: Louise Ras
We dedicated one cloth to applying the oil, rubbing it into the wood. We then waited for it to soak in before rubbing it off with a clean cloth.
We used several cloths – around four or five – cutting up bits of an old cotton sheet as needed. The change was a success.
Applying the oil with a cloth used less product for the same result. It also helped avoid any excess oil that, if not properly rubbed off, leaves a tacky/sticky spot on the surface.
Pros and cons of using wood oil
Pros
- Easy surface preparation
- Little to no sanding means no micro-plastic particles and dust-free work
- Easy application
- Little material needed
- Environmentally friendly (if using natural oil)
- Matte, natural finish
- Unlike varnish, oil is less weather-dependent for application
- Cheaper than varnish: no masking tape, no thinner, less sanding
- No cracking in the sun
Cons
- More regular maintenance
- Reverting to varnish is complicated
- Darker-looking wood
- Matte, not glossy finish
Errors
- Using a paintbrush to apply the oil. It’s wasteful and unnecessary.
- Forgetting to check for any drips… If you don’t rub them off quickly, they stay; a long reddish tear falling down a white hull is anything but classy.
- Take the time to rub any oil off deck caulking, otherwise, it will harden.
- Thorough cleaning is important. We were once a bit lazy and decided not to scrub the wood until the black dirt was gone. This was a mistake. The dirt stayed encapsulated in the oil, which meant more work next time.
Lessons learned
Two years down the road, here are a few lessons learned:
- For application, cloths work better than a paintbrush, and old cotton sheets come cheap at second-hand shops. We prefer cotton cloths to microfibre. The cloth should not leave bits of lint.
- Regularity is key. When the wood is starting to look thirsty, give it some oil. It will be less work to do it now, so avoid procrastinating.
- If you accidentally apply oil on your wooden deck, it will leave a trace for a few weeks or months. If you accidentally apply oil on a painted surface, it is easy to wipe off.
- Rain is not a problem. In our humid northern European climates, oil works perfectly.
- When the wood gets unreasonably dark, it might just be dirty. This is especially true if you keep your boat in a city centre, near a busy road, or close to a power plant or factory.
- If you don’t apply oil regularly enough, the wood turns grey. This means you’ll need to sand it slightly before applying the next coat.
- Varnish, especially that made from synthetic resins, contains or sheds microplastics, so it felt good not to pollute the water or air while still having sharp-looking wood.
- The wood looks protected and healthy.
- Once applied, the oil does not go rancid. No bad smells involved.
- Depending on the brand, the oil itself might not be cheaper than varnish. We opted for an oil blend that is a mix of tung and linseed oil, among others, and contains anti-UV pigments.
Our spars are still varnished with a classic polyurethane glossy marine varnish, and we will probably keep them that way.
Masts are less exposed to UV rays, so the varnish tends to last longer.
All in all, for our purposes – preferring to sail as much as possible while living on a wooden boat – oil trumps varnish.
Regular maintenance is not too difficult for us because we’re always on board.
We are now less stressed and don’t stay glued to the rain radar app when doing maintenance.
One litre of oil now lasts us a little less than a year, a significant drop in our varnish budget.
No question about it, we will keep oiling our wood!
Materials and costs
These are rough estimates for the cost of varnishing our boat versus oiling.
Bear in mind that in the first few years, you’ll need to oil a lot more regularly (like you do when applying varnish to build up coats)
Varnish
- 1 litre of Epifanes Extra UV Filter Clear Varnish is about €40/£32.99 (around 2.5lt used a year, on average)
- 500ml of Epifanes Paint and Varnish Brush Thinner €16/£13.45
- 1 roll of masking tape about €5/£4.21
- 1 good quality paintbrush about €5/£4.21
- 1 box of 10 dust masks about €20/£16.85
- Sand paper – we use Abranet brand, bought online, which costs about €30/£25.27 for a box of 50 papers.
- Total: €130/£110
Oil
- 1 litre of SATOléo Terrasse €30.70/£25.86 (used 1.5lt in the first year and 1.5lt the second year; now use 1lt per year)
- Sponge €1/84p
- 1lt of natural soap €3/£2.53
- Old sheets – free or charity shop €2/£1.68 ]
- Total: €38/£32

Painting and varnishing a boat: how to get the perfect finish
Kit boat builder Polly Robinson shares her tips for painting and varnishing a plywood-epoxy boat
Best boat varnish: 7 top options for gleaming woodwork
Few things are as quintessential to the archetypal sailboat as gleaming, iridescent woodwork that is indicative of a recent coat…

How to restore teak decking: Varnish or oil? Ask the experts
“Can your paint expert help me identify the coating on my boat’s flybridge deck and stairs? “Is it likely to…

8 quick tips for varnishing
Some tips and tricks to get the best finish possible when varnishing your boat's woodwork

The art of veneering: step-by-step
Face up to the task of applying veneer with the help of boatbuilder Tony Davies
Want to read more articles like this?

A subscription to Practical Boat Owner magazine costs around 40% less than the cover price.
Print and digital editions are available through Magazines Direct – where you can also find the latest deals.
PBO is packed with information to help you get the most from boat ownership – whether sail or power.
-
-
-
- Take your DIY skills to the next level with trusted advice on boat maintenance and repairs
- Impartial, in-depth gear reviews
- Practical cruising tips for making the most of your time afloat
-
-
Follow us on Facebook, Instagram, TikTok and Twitter