
Rubbing strakes take a lot of abuse, so it is important to pay them some attention. Ben Meakins shares how he made the ones on his boat as good as new

When we first found our Snapdragon 23, her rubbing strakes were covered in a combination of moss, lichen and general grime.
A blast with a pressure washer – not so close as to damage the wood fibres, though – removed this, and we thought no more of them until we took them off for hull and deck refurbishment a few months later.
Apart from their weathered appearance and a few dings, the rubbing strakes were not in bad condition at all.
We scrubbed off any remaining dirt and growth with a Scotch-Brite pad before bringing out the teak cleaner.

The dirty and lichen-covered rubbing strakes
For this, we chose Wessex Teak Cleaner and Teak Renovator, a two-part cleaner and restorer.
We applied the cleaner with a cloth and left it to work for 10 minutes before rinsing off.
Scrubbing with a scourer worked the solution well into the wood.
Next came the restorer, which we applied in the same way.
With the rubbing strakes dry, we were able to examine them.
The teak’s original colour was not restored, but the grain of the wood was raised where it had weathered, and a few areas were missing chunks of wood.

Giving the rubbing strakes a good cleaning produced surprising results
The perfectionist’s solution would have been to graft a graving piece into the damaged area, but they weren’t actually that bad and in any case, a rubbing strake is there to do a job – take the knocks.
We sanded back the rails by hand until the raised grain was removed and each one was smooth, before using an electric sander to fair the damaged areas back to bare wood.
For a number of reasons, we opted to coat the rails with International’s Woodskin before reattaching them to the boat: it would allow us to coat the back of each rail, thereby making it waterproof, and Woodskin allows you to paint and touch-up patches, blending them in seamlessly.
This meant we could paint the rails off the boat and not worry about getting Woodskin on our smart paint job.
We could then install them and touch-up the plugs over the screw holes separately.
With three coats of Woodskin applied, we set about refitting the rails. Here’s how we did it:
Refurbishing rubbing strakes: step-by-step

1. We used a 12mm plug-cutter on a drill press to make enough teak plugs – plus a few spare – to cover all the screw holes.

2. With a large, sharp chisel, we sliced the plugs from the teak block.

3. We then used a 12mm drill bit to enlarge and clean out all the plug holes in the rubbing strakes.

4. We dry-fitted each rail, redrilling some of the screw holes which were filled during hull/deck joint fitting. Tape on the bit acts as a drill depth gauge to avoid going too deep.

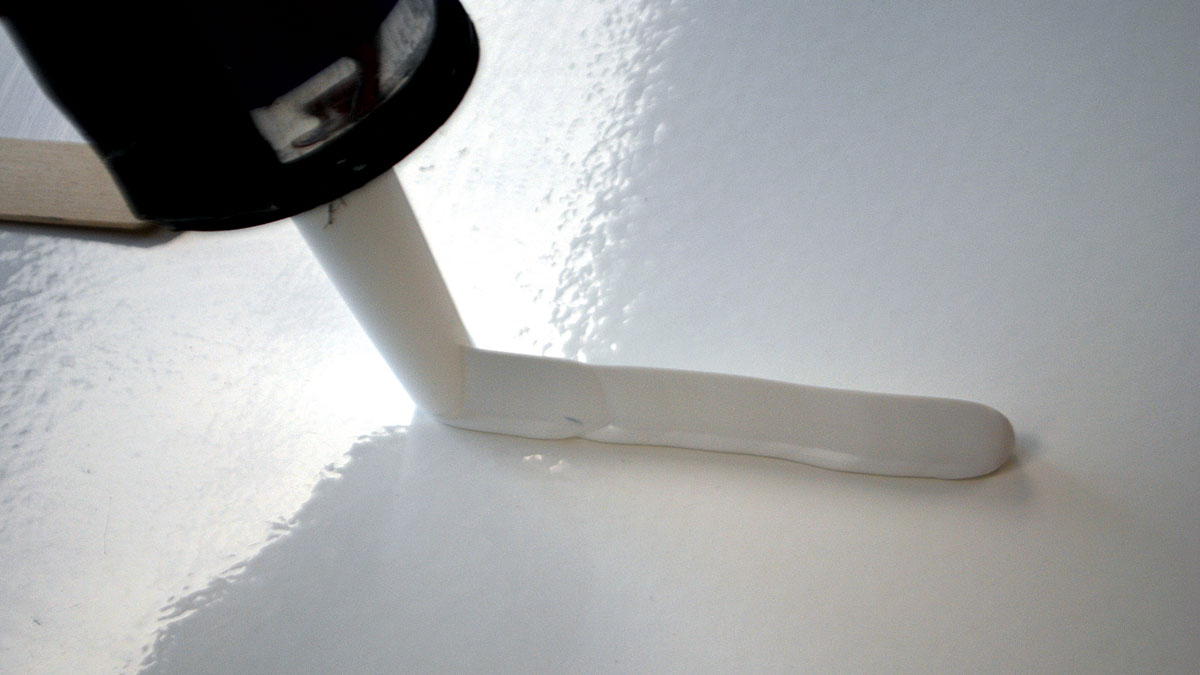
5. We applied an adhesive sealant, Aquaseal’s mBond 295, to the back of each rail in two lines, using a notched nozzle to apply a triangular bead. This spreads out more evenly under pressure than a traditional round bead.

6. Next, the rails were offered up to the boat. We loose-fitted all the screws first before finally screwing them home tight.

7. Excess sealant was squeezed out, and we cleaned it up using a scraper made from a plastic container lid…

8…before using De-Solv-it wipes to clean up any excess sealant, aiming to leave a neat, even bead. These were an excellent find!

9. Now we could fit the plugs. We mixed up some epoxy thickened with microballoons, and dipped each plug into it…

10…and pushed them into the hole so the grain lined up with that of the rubbing strake. A tap with a mallet drove them home.

11. With the epoxy cured, we first trimmed the plugs using a fine-toothed Japanese ‘pull’ saw…

12…before using a block plane to cut them back to the level of the surrounding teak.

13. Sandpaper finished the job of smoothing each plug with the strake.

14. A paintbrush and three coats of Woodskin later…

15… and the finished job looked great. Under close examination, the teak rails show their age in places, but step back and they look as good as

Boat wood: a complete guide for yacht owners
Boatbuilder and finisher Lyndon March explains which types of wood work best for different repairs and modifications on board
9 tips and tricks for applying sealant
Premium bonding: Ben Meakins outlines some techniques for getting the most out of sealant without ending up covered in the…

Polyurethane vs silicone sealants: Which is best for use on boats?
They’re not the same as adhesives but some sealants – such as Sikaflex – do have adhesive properties. There are…
How to fit a removable mainsheet track
When your boat’s mainsheet arrangement doesn’t quite do the job it’s not difficult to improve upon it yourself. Here’s how…
Want to read more practical articles?

A subscription to Practical Boat Owner magazine costs around 40% less than the cover price.
Print and digital editions are available through Magazines Direct – where you can also find the latest deals.
PBO is packed with information to help you get the most from boat ownership – whether sail or power.
-
-
-
- Take your DIY skills to the next level with trusted advice on boat maintenance and repairs
- Impartial in-depth gear reviews
- Practical cruising tips for making the most of your time afloat
-
-
Follow us on Facebook, Instagram, TikTok and Twitter