



Regular servicing of your winches will optimise their efficiency and prevent premature wear. Stan Cockeram explains how to go about it, and suggests some simple checks to avoid mid-season failures
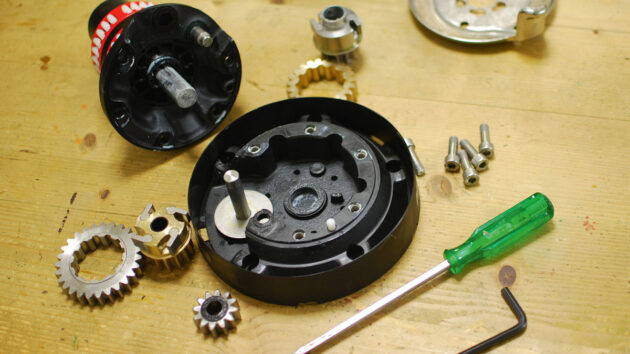
An aspect of boat many people are still intimidated by is winch servicing. Serious cruisers (aren’t we all?) are likely, but by no means certain, to service their winches as part of the process of laying up or recommissioning, but many winches go on for years without being given a second glance. Nevertheless, an annual service confers distinct benefits.
Without servicing, a winch will become less efficient and will wear out prematurely. How often do you hear people complain that they are going to need new winches because their existing winches aren’t powerful enough? It’s amazing how much efficiency and power can be restored by a proper service. And to begin with, if you are using, say, an 8in handle, try a 10in one – that will give you 25% more power instantly.
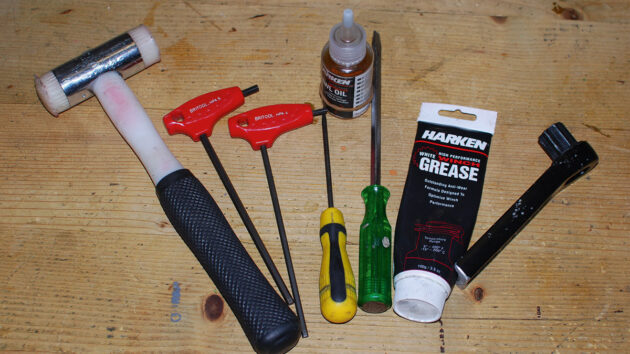
Tools and consumables needed for winch servicing
The essential winch servicing principles apply to nearly all conventional capstan yacht winches.
-
Assemble information, tools, consumables and parts for your winch
-
Open and dismantle the winch
-
Degrease the parts
-
Inspect all parts of the winch
-
Replace broken or badly-worn parts
-
Reassemble, lubricating as you go
-
Close and test the winch.
Manufacturer websites should help you with service instructions and diagrams. You will need the correct tools, such as screwdrivers and Allen keys, while consumables include winch grease, a suitable machine oil and a thread lubricant/barrier. You should also have the correct pawls and springs for your winch as different manufacturers DO NOT use the same pawls; and although they might ‘nearly’ fit, they will cause damage or malfunction.
Winch servicing: dismantling
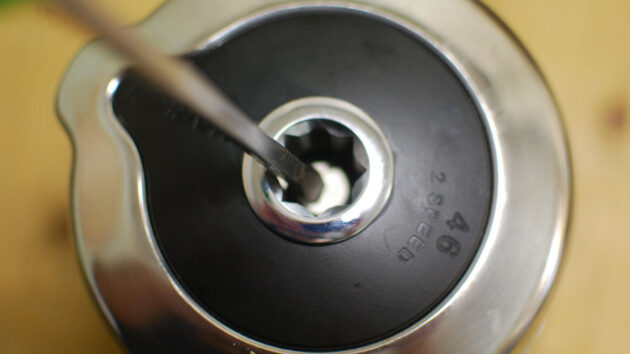
Removing the top: care should be taken not to lose any parts
Now we are ready to dismantle the winch. Different manufacturers have different ways to hold their winches together, and the winch data/instruction/service sheet will tell you how to get in. The modern smartphone can be incredibly useful at this point! Preparation is a good idea – old towels, tea towels or similar can be used to create barriers and ‘no-bounce zones’ around the winch to restrict the escape of stray parts during disassembly. They will also protect the deck from the oil, grease and other such nastiness which is about to be revealed.
Access is usually gained by removing either the handle socket or the top cap of the winch. This can be more complicated in the case of larger winches, especially those with more than two gears, but in all cases you are looking to get to the point where you can lift the drum up and away.
This is your first major opportunity to lose parts – the old ‘bounce once and splash once’ tale of woe, sometimes exacerbated by desperate lunges to catch the errant part, resulting in further loss of parts. The correct approach is to ensure there are no loose parts in the top of the drum, then lift slowly. Look to see if any bearings are stuck in the drum rather than sitting nicely on the stem. Always angle the drum as you lift it so that anything that does fall out will fall into the boat rather than out of it. Set the drum down carefully and look at what you have revealed. You should see the main drum bearings (either caged needle bearings or, in the case of some small winches, a plastic sleeve), the main drive pinion and perhaps some other gears that may or may not be accessible at this point. Lift any gear pins that can be removed and pull out the gears that were held by them.
To go further you will probably need to remove the stem/housing of the winch to reveal the main winch gearing. In the case of small winches which only use the leverage of the handle to produce mechanical advantage, you may well be finished with dismantling at this point and can move to the next stage. In some winches you might not be able to access the gearing of the winch without removing the winch from the deck. This is obviously not ideal, but it does introduce the concept of taking the winch home to complete the service in the warm!
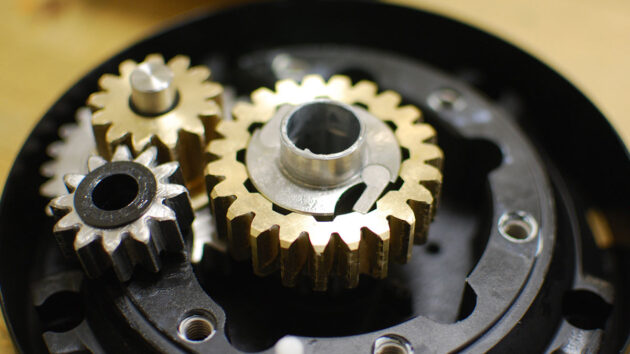
The winch gears revealed, after carefully removing the drum
After the housing is removed, the rest of the winch is now revealed in its full glory. Take out all gears, bearings and shafts (where possible) for inspection. It is good practice to lay the parts out as you remove them so that you can see how they go back together. You might wish to take photographs of the winch in various stages of disassembly to give you a guide for later. Smartphone to the rescue again.
If your winch has a thrust bearing to handle the downward load on the drum (usually only on large winches), consider carefully whether to open it. Unless you have evidence that it needs servicing, it might be as well to leave it alone. If you do decide to open it, be ready for the ball bearings to go everywhere!
Degrease and clean
Once the winch has been reduced to its constituent parts, degrease and clean everything. This is vital for two reasons – firstly to remove contaminated lubricants, and secondly to ensure that the next stage, inspection, is effective.
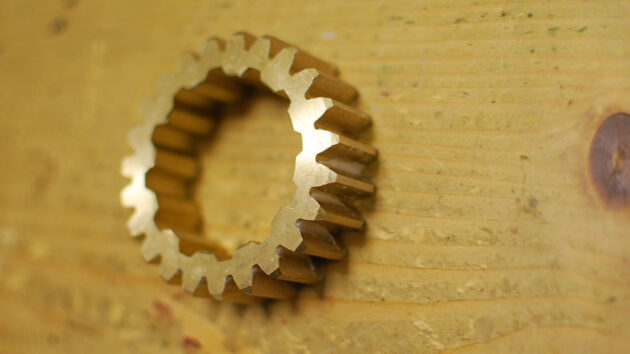
This easy-to-inspect gear is completely clean
Degreasing is best done with a proprietary degreasing agent that can be obtained from chandlers, hardware stores or bike shops. Inspect every part of the winch for damage or wear. This is a vital stage in the service and one which is perhaps most often neglected.
- Corrosion anywhere should be examined.
- All gears and the drum should be inspected for chipped, bent or broken teeth.
- The pawls should sit securely in their pockets and not wobble unduly. Any stretching of the pockets may mean that the part needs to be replaced.
- Pawls that are noticeably rounded off should be replaced. Check the pawl springs are still strong and not broken. n Bearing cages should be intact, with all the individual rollers in place.
- Gears should turn freely on their shafts and the shaft should not turn with the gear as this will cause serious damage to the body of the winch. Make sure the shafts are not worn or bent and that the sockets in which they are located are not damaged, and hold the shaft securely upright.
- Any swarf or other metallic waste is an indication of wear and should prompt some further investigation. You may have to use penetrating oil or leave parts to soak in solvents to get them apart.
- You should take some time to examine the self-tailing assembly of the winch. Are the jaws undamaged? Are the springs working properly? Is the stripper arm undamaged?
- Check the fabric of the drum. Is anodising worn or chrome peeling? Has the grip worn smooth?
Once the inspection is complete, decide what needs to be replaced. Parts for older winches might still be available, but you may have to resort to the boat jumble or similar in some cases. Parts for winches made by companies no longer in existence can present the greatest challenge, but the internet is your best friend in this case. Replacing a drum is a significant investment and a new winch might be a better long-term prospect.
Winch servicing: Reassembly
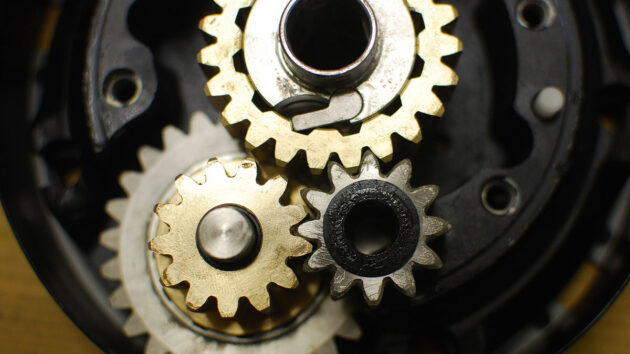
Make sure the gears mesh properly when reassembled
Now that you have a clean and serviceable winch in parts, it is time to reassemble. Reassembly is often the reverse of dismantling.
- Put shafts in place in the winch along with any associated bearings.
- Lubricate bearings and teeth of gears with winch grease. This is easiest achieved with a small paintbrush – you are looking for a thin layer rather than large blobs of grease.
- Reassemble ratchet gears, making sure that the pawls are held properly in their pockets and the springs are in place. Make sure the pawls sit correctly in the teeth of the gears. n Anything that doesn’t look right is probably incorrectly assembled and should be corrected.
- Pawls should be lubricated with oil, NOT grease. Grease may stiffen or harden, leaving the pawl ineffective and allowing the winch to backwind. This is very dangerous and should be avoided at all costs.
- Make sure teeth of gears mesh correctly with their neighbours.
- Refit housing and bolt down, having applied some barrier gel to the screws to enable easier disassembly next time.
- In the unusual case of screws that screw up into something, apply thread-locking liquid to prevent the screw falling into the mechanism.
- Grease and refit the main bearings – some winches now have plastic bearings which are intended to be self-lubricating. You can choose whether or not to put a light coating of grease on these.
- Before replacing the drum, don’t forget to grease the teeth on the inside. The drum should then slide down over the main bearings and, with perhaps a slight jiggle, re-engage with the final pinion gear.
- Refit the top parts of the winch. If the handle socket bears on the inside of the housing (most do), then grease the outside of the socket.
With the winch fully assembled, give it a spin to see that it turns freely. Put a handle in the socket and wind in both directions. If all looks good then our job is done. When you first use the winch under load, make sure that it is all working properly.
How to service your two-speed winch: step-by-step
With spare parts hard to find, Vyv Cox keeps his 15-year-old Gibb winches in fine fettle with a regime of…

How to service an outboard engine: step by step
Stu Davies shares useful maintenance tips on how to keep your 2-stroke and 4-stroke outboard motors running sweetly
2-stroke outboard service in 12 steps
Stu Davies revives a 1989 2hp outboard engine

How to service Monitor wind vane self-steering gear
Dena Hankins and James Lane show their Monitor wind vane self-steering gear some love and learn that patience is a…
Want to read more practical articles like Winch servicing: step-by-step maintenance guide?

A subscription to Practical Boat Owner magazine costs around 40% less than the cover price.
Print and digital editions are available through Magazines Direct – where you can also find the latest deals.
PBO is packed with information to help you get the most from boat ownership – whether sail or power.
-
-
-
- Take your DIY skills to the next level with trusted advice on boat maintenance and repairs
- Impartial, in-depth gear reviews
- Practical cruising tips for making the most of your time afloat
-
-
Follow us on Facebook, Instagram, TikTok and X