
Rob Ferenczi of SmartBoatInnovations explains how to build a smart boat engine monitoring system without spending a fortune.
Ever considered adding an engine monitoring system to your boat?
This article follows on from my introduction Smart Boat article, which showed how to use Home Assistant (HA) and a Raspberry Pi (Rpi) circuit board to build a central boat computer. Now, we’ll take that system to the next level by integrating essential engine monitoring sensors, all connected through one versatile ESP32 microcontroller.
Whether you want to add new sensors for engine temperature and rpm, or harness existing analogue gauge signals for fuel and oil pressure, the engine monitoring system setup described here will help you transform your boat’s instrumentation into a more modern, connected solution.
Why add a smart engine monitoring system?
Most boats already include some level of engine instrumentation – fuel gauges, temperature dials, and oil pressure lights – but these analogue gauges can be limiting: they don’t save historical trends, their built-in alarms are often too quiet to hear above a loud engine, and it’s easy to miss a sudden rise or drop in a parameter when it really matters.
By digitising these values, you can:
Set alerts: trigger alarms, sirens, or flashing lights, and get phone or tablet notifications whenever temperatures, pressures, or tank levels enter a critical range.
Access historical data: trend lines over time reveal whether that slight rise in coolant temperature is normal or indicative of a developing issue.
Enhance existing gauges: keep your traditional analogue readouts but add digital redundancy for improved clarity.
Create smart automations: turn on extraction or bilge blower fans when temperatures spike, or confirm low oil pressure only if the engine is actually running. You can also create more advanced automations, such as using a combination of rpm and engine temperature to detect overheating during high loads.
The best part is that the entire system can be built around a single ESP32 microcontroller, which sends data wirelessly to your central Raspberry Pi (running Home Assistant), turning that Pi into a full-featured boat computer.
The Versatile ESP32 engine monitoring system
The ESP32 microcontroller is the cornerstone of this smart engine monitoring system, offering versatility, affordability, and seamless integration with Home Assistant. Compact yet powerful, it serves as the central hub for collecting and transmitting data from multiple sensors.

An ESP32 microcontroller can be bought for a few pounds. Photo: Rob Ferenczi.
Key Features of the ESP32 are:
Multiple input/output ports: the ESP32 can connect to a variety of sensors, including DS18B20 temperature probes, INA219 modules for analogue signals, and optocouplers for digital tachometer readings. With up to 38 pins (depending on the model), it accommodates a wide range of configurations.
Wireless connectivity: built-in wifi allows the ESP32 to send data wirelessly to Home Assistant on a Raspberry Pi. This eliminates the need for extensive wiring, making installations clean and flexible.
Energy efficient and affordable: consuming minimal power, the ESP32 is ideal for battery-conscious applications. At just £10 per board, it’s an economical solution for building a scalable engine monitoring system.
Expandable: a single ESP32 can handle up to eight INA219 modules, multiple DS18B20 sensors daisy-chained on a single data pin, and additional devices like optocouplers, making it suitable for monitoring multiple parameters simultaneously.
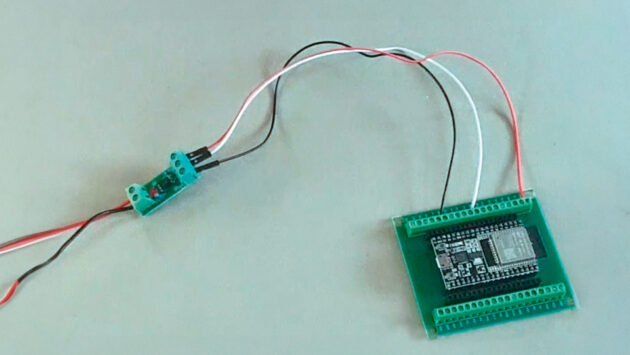
Mounting the ESP32
To ensure a secure and organised setup, the ESP32 is often mounted on a development board or base. This not only provides additional stability but also gives access to screw terminals for easier wiring.
Once mounted, the ESP32 and its connected sensors are housed in a plastic electrical box. This enclosure helps protect the components from dust, minor moisture exposure, and physical damage while keeping the installation tidy.
For added stability, a simple hot glue gun can be used to secure components inside the box, preventing movement or accidental disconnections during operation.
How to wire the optocoupler. Photo: Rob Ferenczi.
Power Supply for the ESP32
The ESP32 engine monitoring system can be powered in two primary ways:
Micro USB connection: the simplest method, which provides both power and a means to connect the ESP32 to a computer for programming.
External power adapter: ideal for standalone applications, a 12V input can be regulated to 5V using a buck converter. The 5V output is then fed directly to the ESP32’s pins, ensuring a stable and independent power source for permanent installations.
Home Assistant ESPHome integration
To integrate the ESP32 with Home Assistant, the ESPHome add-on is used.
1. Initial Setup.
- Plug in the ESP32 to a Windows PC or laptop via a micro USB cable
- Install any necessary USB-to-UART drivers (eg from Silicon Labs). Use ESPHome’s web-based tools (web.esphome.io) to flash a base firmware onto the ESP32.
2. Configure and Connect
- Provide your wifi credentials so the ESP32 can join your network.
- Once online, you can update and customise the configuration over the air (OTA), without reconnecting the USB cable.
3. Home Assistant discovery
- The ESP32 will be automatically discovered by Home Assistant, allowing seamless integration of sensors you define in ESPHome’s YAML configuration.
- After a straightforward setup, the ESP32 becomes the backbone of your Smart Boat’s data collection, funnelling important information to a central dashboard in Home Assistant.
Temperature monitoring with DS18B20
When it comes to monitoring engine temperature or other high-heat areas, consumer-grade wireless sensors often can’t handle the extreme environment. That’s where the DS18B20 sensor excels.
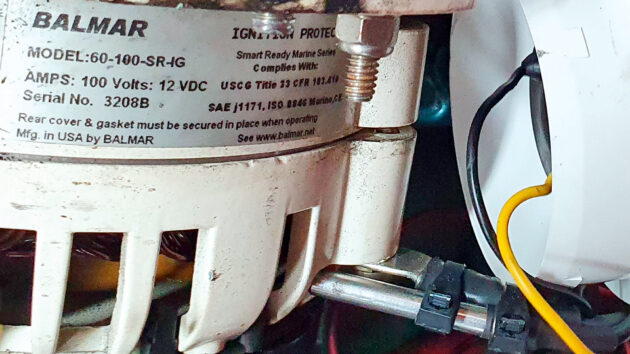
(1) DS18B20 sensors have been installed on the boat’s alternator, raw water elbow, close to the thermostat and on the engine’s coolant system. Photo: Rob Ferenczi.
For around £15, you can buy a pack of five DS18B20 (Dallas) temperature sensors. They use a single-wire data bus, meaning you only need one data wire (plus power and ground) to connect multiple sensors to the ESP32.
The probes are great for use in an engine monitoring system as they have high temperature tolerance, measuring up to 125°C; are compact and waterproof so ideal for placing near thermostats, raw water elbows, or alternators; and they log historical data so are perfect for diagnosing cooling system issues or worn impellers by spotting abnormal temperature rises.
On my boat, I’ve installed four DS18B20 sensors at key points: the coolant system, near the thermostat, the raw water elbow, and the alternator. With Home Assistant collecting and storing data, I can easily review how each location’s temperature behaves over time.
For instance, under normal conditions, my raw water elbow stays around 38-40°C; I’ve set an alert if it creeps to 42°C, indicating potential cooling troubles like a clogged intake or failing impeller.
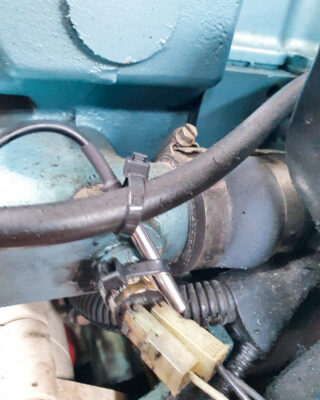
(2) DS18B20 sensors have been installed on the boat’s alternator, raw water elbow, close to the thermostat and on the engine’s coolant system. Photo: Rob Ferenczi.
See smartboatinnovations.com/code/dallas-temperature for working ESPHome YAML definition for temperature monitoring.
Oil pressure monitoring
Oil pressure is one of the most critical parameters in any engine. While many engines have a basic oil pressure alarm, it may not be loud or flexible enough for real-world use. By integrating oil pressure readings into a smart monitoring system, you gain:
Early warnings: trigger loud horns or push notifications when pressure goes too low.
Trend analysis: spot gradual changes in oil pressure over time and plan maintenance accordingly.
Single ESP32 integration: use the same microcontroller for temperature, fuel, and oil pressure data.
There are two approaches to installing a sensor. For some boats, you can use a T-fitting to install an additional oil pressure sensor for the smart system, alongside the existing engine sensor. Alternatively, if space is tight or you don’t want to modify the plumbing, you can tap into the existing oil pressure sender.
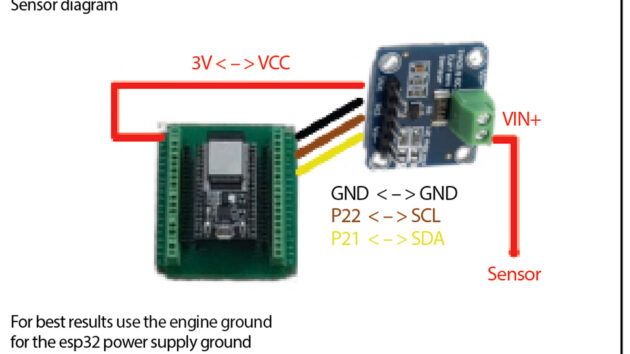
How to wire the sensor for monitoring the oil pressure. For best results, use the engine ground
for the ESP32 power supply ground. Photo: Rob Ferenczi.
The INA219 module is a compact, affordable solution for measuring the voltage output from the oil pressure sender, which directly corresponds to the oil pressure. At just £2, it integrates seamlessly with the ESP32, making it an excellent choice for digitising analogue signals. By connecting the sender’s voltage output to the INA219, along with power and communication pins to the ESP32, you can easily capture and process oil pressure readings.
In ESPHome, a configuration maps the measured voltage to the corresponding oil pressure values, ensuring accurate and meaningful data. These readings can then be displayed on your dashboard, providing real-time monitoring and enabling automated alerts for low oil pressure conditions. Furthermore, the ESP32 can support up to eight INA219 modules, allowing you to monitor multiple sensors simultaneously and expand the system as needed. See smartboatinnovations.com/code/ina219 and smartboatinnovations.com/code/oil-pressure for working ESPHome YAML definition for the INA219 and oil pressure.
Tachometer (rpm monitoring)
Next, let’s look at how to set up a digital tachometer.
Rpm (revolutions per minute) is not only useful for basic engine information but also for advanced automations, such as calculating engine hours, fuel consumption and service intervals.
For the tachometer, we can pick off pulses from the alternator’s stator winding. Using an inexpensive optocoupler (around £5), we feed the alternator’s pulse signal into the ESP32. The optocoupler isolates the high-voltage spikes from the alternator with an internal LED and phototransistor, protecting our microcontroller.
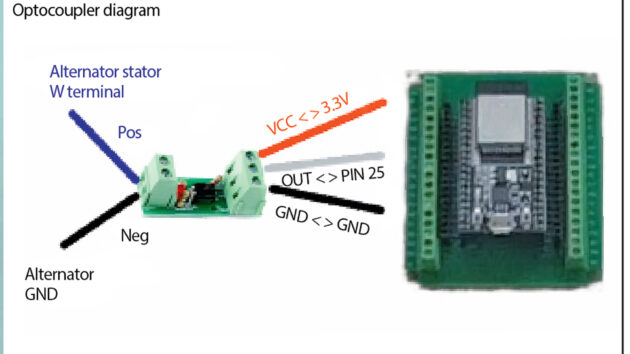
How to wire the optocoupler for rpm monitoring. Photo: Rob Ferenczi.
In ESPHome, a configuration maps the number of pulses measured to the corresponding rpm value, ensuring accurate and meaningful data.
Once configured in Home Assistant, you’ll see your engine rpm on a digital gauge. You can also track total engine run hours and historical rpm data, making it easy to correlate fuel consumption or performance changes with specific speeds.
See smartboatinnovations.com/code/digital-tachometer for working ESPHome YAML definition for the optocoupler and tachometer.
Fuel (or any resistance-based sensor) monitoring
Analogue fuel gauges typically work by measuring the resistance in a float sensor inside the fuel tank. This principle is also used for other instrumentation, such as water tank levels or coolant temperature senders, which rely on variable-resistance sensors. It’s the same method we applied for the oil pressure sender.
Just like the oil pressure sender, most fuel tank sensors operate on a variable-resistance principle. The INA219 module reads the voltage signal generated by the sender and relays it to the ESP32 for processing. Simply connect the sender’s signal wire to the INA219, add power and communication connections to the ESP32, and configure the setup in Home Assistant.
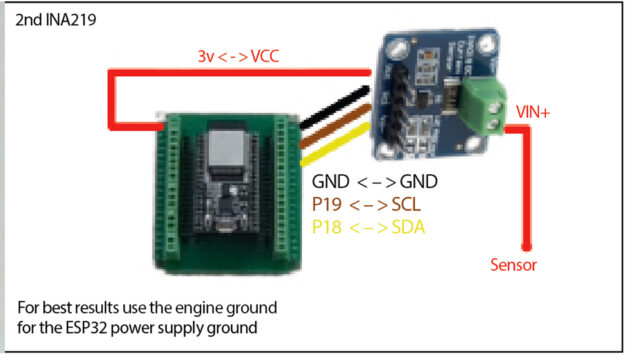
How to wire the sensor for fuel monitoring. For best results use the engine ground for the ESP32 power supply ground. Photo: Rob Ferenczi.
Once configured, you’ll have real-time fuel level monitoring, complete with the ability to display the data on your Smart Boat dashboard and store historical readings for analysis. This integration also allows for customised alerts, such as notifications for low fuel levels or unusual fluctuations, enhancing both safety and convenience on board.
See smartboatinnovations.com/code/digital-gauge and smartboatinnovations.com/code/digital-tank-gauge for working ESPHome YAML definition for the INA219 and the fuel tank.
Keep informed with an engine monitoring system
By combining a few affordable components with a single ESP32, you can transform your boat’s traditional engine instrumentation into a modern, feature-rich engine monitoring system. The setup integrates seamlessly with Home Assistant, allowing you to digitise and enhance the critical engine parameters we’ve mentioned.
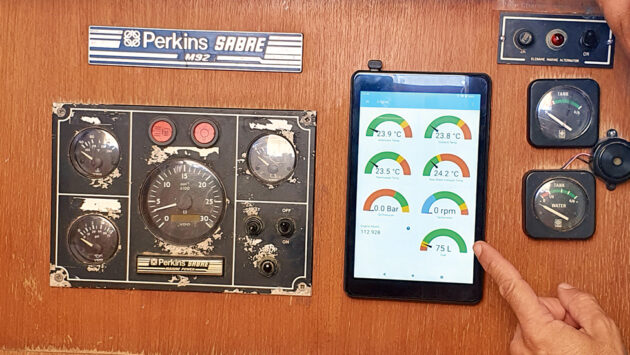
You can configure automations to react to critical thresholds, log data for historical analysis, or display everything on a sleek, user-friendly dashboard. This dashboard is easily accessible on tablets, smartphones, or dedicated displays, providing you with valuable insights at your fingertips.
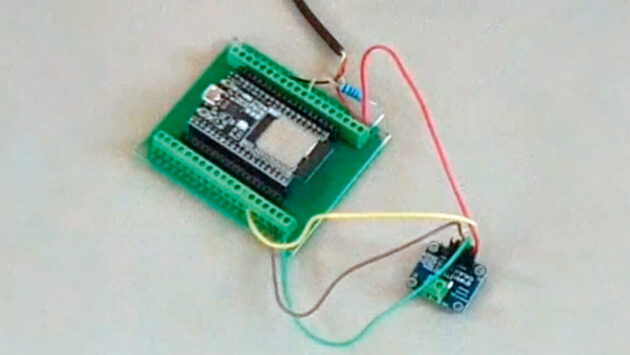
How to wire the sensor for monitoring. Photo: Rob Ferenczi.
With the ability to monitor and automate key systems, this solution not only improves safety and efficiency but also simplifies the management of your boat’s engine. Whether you’re planning long voyages or maintaining your boat’s health over time, a smart boat system offers unparalleled control and peace of mind. Best of all, the system is infinitely expandable, allowing you to integrate additional sensors and features as your needs evolve.
From enhanced safety to smarter automations, this engine monitoring system is a vital step toward modernising your boat and ensuring a smoother, more enjoyable boating experience.
The video below shows the engine dashboards in use.
Rob Ferenczi is a seasoned sailor who owns a custom Adams 49, Topaz. A computer science graduate, he is on a mission to utilise free, open-source software and affordable sensors to turn any boat into a high-tech vessel. See his Smart Boat Innovations on YouTube and via his website smartboatinnovations.com.

Smart boat: how to control your yacht remotely for under £400
Rob Ferenczi shows how you can have remote and onboard systems monitoring on your yacht for under £400

Embracing electronic navigation – one reluctant boater’s tale
Celestial navigation instructor Paul Jones reluctantly got to grips with electronic navigation and is now "out of the fog and…

Overhauling the DC boat electrics on a 38ft boat
Richard Thomson explains how he gave his 1983 Trident Marine Voyager 38’s electrical system a complete and cost effective overhaul.
Want to read more articles like this?

A subscription to Practical Boat Owner magazine costs around 40% less than the cover price.
Print and digital editions are available through Magazines Direct – where you can also find the latest deals.
PBO is packed with information to help you get the most from boat ownership – whether sail or power.
-
-
-
- Take your DIY skills to the next level with trusted advice on boat maintenance and repairs
- Impartial, in-depth gear reviews
- Practical cruising tips for making the most of your time afloat
-
-
Follow us on Facebook, Instagram, TikTok and Twitter