
Genevieve Leaper explains how friend Sokratis Kavallieratos laid a new teak deck on his Najad 320

When it came to sorting out the leaking teak deck on my partner Aleko’s Nicholson 32, Beduin, we chose the easier option of getting rid of the teak for the non-slip covering, SoftSand.
Our friend Sokratis took on the considerably bigger and more difficult but ultimately rewarding task of replacing a worn deck.
Peran is a Najad 320 which he has owned for 25 years. Built in 1985, she was fitted with a teak deck as new but, unfortunately, the previous owner had the decks sanded every year.
As a result, the teak was already thin when Sokratis bought the boat.
At first glance, the decks looked fine, but on slightly closer inspection the problem was obvious, with patches of glassfibre showing where the planks had completely worn away.
Sokratis trained as a boatbuilder in the USA many years ago and was involved in building the replica of Kyrenia, a trading vessel from the 4th century BC discovered in Cyprus.

The hard work clearly shows – the new teak deck on the Najad 320, Peran. Credit: Sokratis Kavallieratos
So he has the skills, although admits to being a little rusty as he hasn’t done any boatbuilding since 1988.
Having seen many poorly-laid decks, he didn’t trust anyone else to do the work but was having trouble finding an ethical supply of teak, so he asked if Aleko could help.
Aleko did indeed have a couple of large pieces of teak, left over from a building job many years ago, and the workshop machines to cut it.
Hence the decision to join us in Milina, a small harbour in the Gulf of Volos in the Aegean, where the skippers could work together.
The ideal working environment would be a shed with space for scaffolding around the boat to work from outside at a comfortable height, but it was cheaper to work with the boats afloat in the harbour.
The original deck was 12mm teak, glued and screwed, but as the deck wore down the screws had already been removed and plugged.
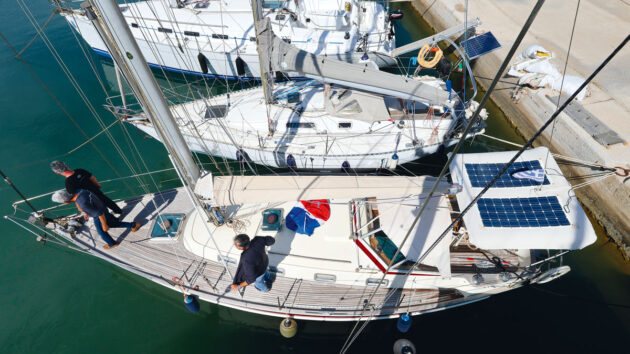
To save money, Sokratis replaced the teak deck while his Najad 320 was still afloat. Credit: Genevieve Leaper
For the new deck, Sokratis wanted to do without screws which meant the planks could be thinner (8mm) but would need to be glued down with epoxy rather than silicone.
Reducing the volume of teak obviously has both economic and environmental benefits and, in any case, it’s not advisable to use much thicker planks when glueing with epoxy.
The deck should last just as long as thicker planks screwed down, as epoxy-glued planks can be worn thinner before they have to be replaced.
Preparing to lay a new teak deck
Before sailing to Milina at the beginning of April, Sokratis had already measured the old deck planking precisely and taken photographs for reference.

Precise measurements of the old deck helped when cutting the new planks with minimal wastage. Credit: Genevieve Leaper
He’d done some research into materials and calculated quantities of epoxy and caulking to buy.
Removal of the old teak deck
The side decks only run to the front of the cockpit so there weren’t quite so many fittings to remove as on our Nicholson 32, and the shroud plates could be lifted up to work around the rigging.
The anchor windlass was left on for most of the time in case it was needed, the boat being moored Mediterranean style, stern-on to the quay.
The old teak came off in about three days using a hammer and chisel, and an oscillating multitool, but the silicone glue underneath was much harder to shift.

Removing the old teak deck was a slow process using a hammer and chisel. Credit: Genevieve Leaper
In fact, this was by far the worst part of the whole project; “a job for convicts,” muttered the skipper after hours of hard work for little visible result.
However, as epoxy was going to be used, it all had to come off.
Once most had been removed with a scraper – and much elbow grease – the oscillating multitool became effective.

A vibrating multitool helped lift the old planks and remove the old silicone glue. Credit: Genevieve Leaper
Only then could a powerful sander be used for the final stages.
Having finished the sanding one morning, there was a rush to get a coat of epoxy over the deck and fill the screw holes to ensure the deck was watertight by the evening.
Just as well; the rain that night was even heavier than forecast.
Cutting teak
Next, the work moved to Aleko’s workshop to cut the teak, and it started to get interesting, though also noisy and dusty.
Aleko had a splendid piece of teak, about 6m x 40cm x 5cm, which had been stored in his workshop for 20 years.
Weighing nearly 100kg, it took four people to manhandle it out of the wood store and put it through the bandsaw for the first cut.
I noticed that even the toughest guys wear gloves for handling teak as it produces particularly nasty splinters.
Inhaling the dust is not good for the lungs either, so use appropriate personal protective equipment.

The 6m length of teak weighed so much it took four people to lift it from the wood store to the saw. Credit: Genevieve Leaper
Because teak is a very oily wood and can contain a high level of silica, the bandsaw blade gets hot when cutting, and a special carbide-tipped blade is required.
A normal blade would soon be damaged, leading to a wide and irregular cut.
The carbide-tipped blade is expensive but lasts a lot longer and, with its narrower cut, reduces waste and eliminates a lot of the need for planing.
Cutting requires some planning to minimise the wastage of valuable timber and make the best use of the grain.
First, the big plank was cut in two lengthwise. Then, two slices were taken off the 5cm thickness for the wider covering boards, which get less wear; here, the grain is less important.
This left the right thickness (3.15cm) for the main deck planks to be cut across the grain (the angle should be between 45° and 90°).
This is important for resistance to wear – and why you get ridges if you scrub too hard.
Edge boards
The covering boards at either edge of the deck are much wider than the planking, so they had to be cut to the curve of the hull and cabin.
With the old board to use as a pattern, the job could be done in the workshop; the first cut to fit along the toerail or cabin side with the bandsaw, followed by a parallel cut on the opposite side with the circular saw.
Without a pattern, the job would have to be done on the boat by jigsaw. Wider boards were also cut for framing around the foredeck hatches.
Peran has a strongly cambered deck which is no problem with the longitudinal planks, but parts of the framing around the forehatch and chain locker lie across the deck.
Trying to bend the wood to shape is likely to break it, so the framing pieces were cut in a curve with the bandsaw.
By cutting all the curved sections together, all came out of a single 5cm thickness of teak, with hardly any waste.

Much of the old teak from Beduin’s side decks could be used for the shorter planks on Peran’s new deck. Credit: Genevieve Leaper
A jigsaw with a fine blade was then used to shape the framing pieces.
The original forehatch frame had kerf cuts in the underside to allow bending; the cuts now showing through the worn teak.
The 6m lengths from the available teak were not long enough for the full length of the deck on the outside, necessitating a few joints which, of course, would be staggered.
With the long planks starting at the bows, the joints could be limited to the side decks and not spoil the aesthetics of the foredeck.
Closer to the cabin, some single planks would run the complete length. The short pieces were recycled from the old deck planks Aleko had taken off Beduin.

The first cut on the 100kg piece of teak, half of which now resides on Peran’s deck. Credit: Genevieve Leaper
These were 3.6cm wide and mostly still 9-10mm thick, so they were cleaned up to provide the shorter planks for Peran.
After planing the top surface and cutting to width and thickness, they looked as good as new.
The central kingplank was also cut from a different piece of teak to obtain a wide enough piece with the correct grain.
The foredeck is obviously a high-wear area.
It wasn’t done all at once, but altogether, Aleko and Sokratis spent several days in the workshop cutting and machining the teak.
The job was made easier and more efficient by having the precise dimensions of the components of the old deck.
The estimated wastage of timber was just 5%.
Laying the teak deck
Deck laying started on the outside with the covering board along the toerail.
Sokratis spent quite a while carefully fitting and shaping before starting with the epoxy.
As it gives the curvature that all the planks will follow, glueing down the covering board is the point of commitment; get this wrong and it’ll show at the end when you come to the central kingplank.
It’s also important to be aware that the boat may not be perfectly symmetrical.
The inner covering boards along the cabin sides and the kingplank were cut to width (but not shaped yet) so they could also be dry-fitted to give reference lines for the planking.
While Aleko and I had been in a hurry to get our deck done and go sailing, Sokratis had a different, possibly better, philosophy.

The process began with the covering board, which determines the curvature of the rest
of the planks. Credit: Genevieve Leaper
Peran’s deck was not just a task that needed doing; he was determined to take his time and ‘enjoy the job’.
I suspect our friend is also something of a perfectionist. There were a few delays due to weather and neighbouring boats enthusiastically hosing decks.
As Sokratis commented wryly: “The weather forecast tells me when it will rain but not when the neighbour will be washing his deck.”
Milina harbour can be uncomfortable, or worse, in westerly winds.
Luckily, there were no really strong westerlies but one day the boats were bouncing around too much to work, so Aleko and Sokratis both went off to anchor in the shelter of nearby Alatas island.
With a spell of unseasonably hot weather in April, one batch of epoxy went off too quickly and started smoking, even when using a slow hardener – in the UK, I am more familiar with the opposite problem of trying to keep the working area warm enough for epoxy to cure at all.
The solution in the Med was to rig sunshades over the decks, use wider bowls for mixing and decant the epoxy into a smaller container which could be kept in the fridge; even if that did mean reducing storage space for beer.
Once the covering boards are in place, the planks follow from the outside.
Work proceeded slowly at first, but after the initial practical problems, Sokratis was starting to establish a routine. “Planking seems easy now,” our friend declared when we returned from cruising.
Easy maybe, but it still takes time and meticulous attention to detail, as I came to realise when I spent a morning observing.

Planks are dry-fitted before being glued into place. Credit: Genevieve Leaper
At every stage, the planks are dry-fitted first, the ends shaped and sanded as necessary.
Once happy with the fit, Sokratis would work out exactly how to hold the plank in place with wedges, clamps and weights; as every plank is in a different place, the system has to be adjusted each time.
Clamps have a rather precarious hold on the thin planks and are easily dislodged. More than one would be at the bottom of the harbour if they hadn’t been tied to the guardrail.
After marking along the edge to show where to apply epoxy, both the plank and deck are cleaned with acetone.
This is essential to remove the surface oil from the teak before glueing with epoxy.
Kitchen scales, well wrapped in clingfilm, are ideal for mixing epoxy accurately by weight. Microfibres were added to make a thick paste, the consistency of peanut butter.
One plank at a time
Working mostly on his own, Sokratis preferred to do one plank at a time. With two people, it’s possible to lay two planks, spreading the epoxy for both at once.
There’s not much space to work on a narrow sidedeck, and it is all too easy to tread in the resin (mentioning no names).
I could see the advantage of being able to work from a platform outside the boat. Wooden spacers are placed in the epoxy against the previous plank, and short pieces of wood are laid over the deck to keep the new plank out of the resin until it is lowered into place.

Block spacers are used to maintain the correct gap and temporarily screw the planks down while glueing. Credit: Genevieve Leaper
The ends are correctly placed and held down with heavy weights (5kg).
As the plank is bent into place, the short pieces of wood are slid out from underneath. Then it is held down by the various weights, wedges and clamps prepared during the dry fit until screwed down.
Sokratis used 4mm Fixe Deck blocking wedges from Directeck – square plastic spacers with a central hole for the temporary screw.
Even at this stage, tiny adjustments had to be made to ensure the gap between planks was the correct width all the way along. Small errors can accumulate.
The wooden spacers can now be removed and tools cleaned while waiting for the epoxy to cure to the consistency of chewing gum.

The planks are held in place with clamps and weights, then screwed down while the epoxy cures. Credit: Genevieve Leaper
This is the easiest time to scrape out the excess epoxy between the planks and along edges, but it’s still a messy job with frequent cleaning of tools required.
The screws are left in until the spacers are needed again, marking before removal to make sure no holes are missed when filling with liquid epoxy by syringe.
By then, it’s probably time for lunch, and the whole process can be repeated on the other side of the boat in the afternoon.
By working alternate sides morning and afternoon, it was possible to always be working on the shadiest side of the boat.

Framing around hatches is trickier than planking; wider boards of teak are also needed. Credit: Sokratis Kavallieratos
While planking is straightforward, if repetitive, the framing around the hatches is more complex.
Sokratis was obviously pleased to be using his skills again and, for him, the best part of the job was the actual woodwork to shape pieces.
“Teak is such a nice wood to work with,” he said. The forehatch framing was completed quite early, so it was in place to fit the planks around. The inside covering boards were the last pieces to be glued on the side deck after all the planks.
That left the last few planks on the foredeck – shorter but more shaping required – and finally the central kingplank.

The kingplank is weighted down while being glued into place. Credit: Sokratis Kavallieratos
This is a significant moment; the actual glueing of the kingplank is not a difficult task, but it ‘epitomises all the work that was done to reach this point’.
This is where you see that you’ve got it right.
To me, the symmetry looked perfect, and even Sokratis admitted to being 85% happy with the job.
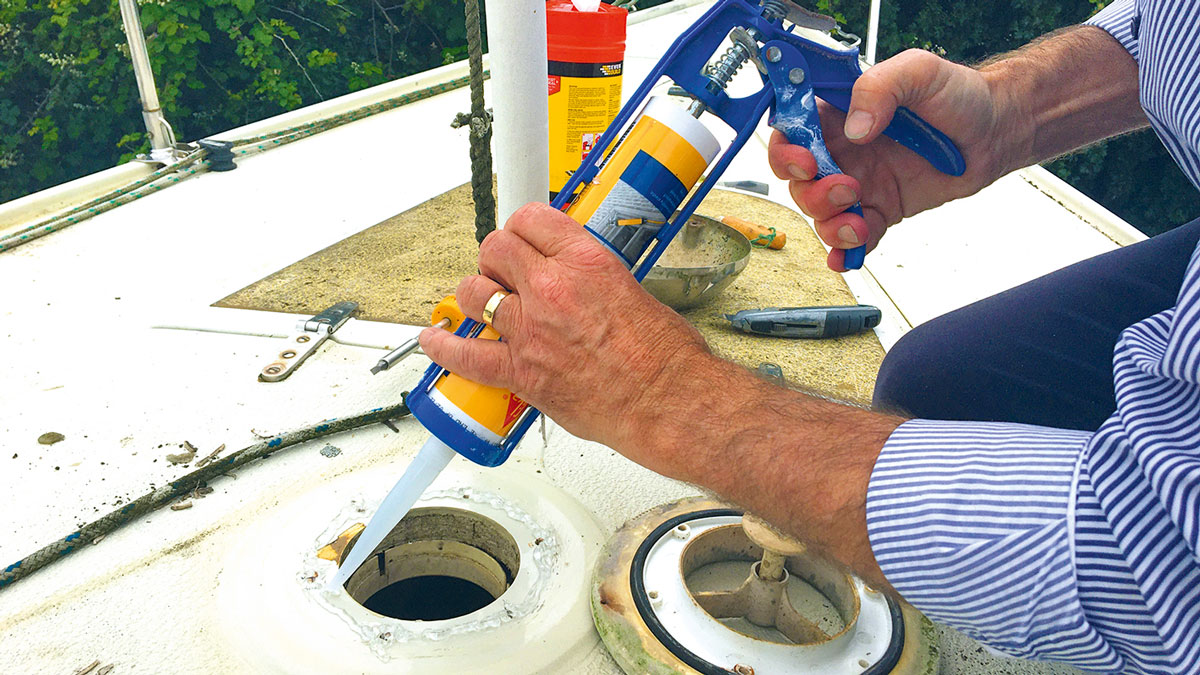
Caulking the teak deck
By the time the deck was laid, it was July, and the weather was getting hot.
Caulking 245m of seams took several days, as it was hard to work for more than a few hours in the morning.
The SIS 440 Teak Deck Caulking used is a silane-modified polymer. This newer type of sealant is claimed to combine the advantages of polyurethanes and silicones with very good adhesion (no primer required), improved flexibility and superior weathering resistance to both UV and cold conditions.
These compounds are also supposed to be more environmentally friendly due to lower volatile organic compound (VOC) levels.
Bond-breaker tape is often recommended under the caulk to prevent it from pulling away from the sides if the wood shrinks.

The planking glued into place ahead of caulking. Credit: Sokratis Kavallieratos
However, as the teak was old (and in a stable condition) and the caulking was done in very hot, dry weather, Sokratis reckoned this unnecessary.
Caulking can be a messy business, whichever type you use; all too easy to get a tiny bit on your hands and inadvertently smear it everywhere.
Sokratis found that changing gloves frequently was the answer, getting through 50 pairs of disposable nitrile gloves.
He worked by masking and caulking several seams at a time on each side, so there was always enough area to stand on.
A battery-powered caulking gun was bought for the job; he reckoned it was money well spent.
Finishing touches
The final stage was the light sanding of the whole deck – the silane polymer sands well – and touching up the caulking where necessary.
Then it was just a matter of replacing deck fittings. Sokratis had expected to be working for at least three months and wasn’t surprised that the job took longer, though extending into the hottest part of summer did slow things down.
As for materials, he used more epoxy (9kg) than he’d estimated but less caulking than calculated from the manufacturer’s charts (15 x 592ml ‘sausages’ instead of 18).

The planks are masked and then the caulking begins. Credit: Sokratis Kavallieratos
Sokratis told me he enjoyed the project; for him, it was a way to celebrate 25 years of ownership.
Certainly, Peran will be looking very smart for her 40th birthday this year!
However, he would advise anyone to think carefully about undertaking such a big project and admitted it would be much better to work under cover, preferably with two people.
Replacing a teak deck is costly and time-consuming; even removing an old deck is no small undertaking.
So, if you have a teak deck, look after it!
Regular light brushing or washing should be enough to keep it clean.
Salt water is much better for the wood than fresh water and chemicals are best avoided.
Enthusiastic scrubbing will shorten its life… and don’t even think of sanding!
Best marine sealants and adhesives for boat jobs
With help from adhesive and sealant expert Laurie Brebner, PBO’s Ali Wood explains which works best for different jobs on…

Coating a GRP deck with SoftSand coating
Genevieve Leaper and Aleko Stephan remove the old teak deck on their Nicholson 32 and renovate the original GRP with…

10 low-cost solutions for non-slip decks on boats
Anti-slip decks are vital for safe sailing, with a wide range of attractive, long-lived, and sustainable coverings available. Jake Kavanagh…

10 Teak Cleaners tested
We get scrubbing to find out what effect a variety of teak cleaners have on the woodwork of a Sigma…
Want to read more articles like this?

A subscription to Practical Boat Owner magazine costs around 40% less than the cover price.
Print and digital editions are available through Magazines Direct – where you can also find the latest deals.
PBO is packed with information to help you get the most from boat ownership – whether sail or power.
-
-
-
- Take your DIY skills to the next level with trusted advice on boat maintenance and repairs
- Impartial, in-depth gear reviews
- Practical cruising tips for making the most of your time afloat
-
-
Follow us on Facebook, Instagram, TikTok and Twitter