
Rupert Holmes shares how he redesigned and refitted the deck hardware on his Quarter-Tonner, Minestrone
Returning Minestrone to a sound structural condition was a long struggle – and like many projects the scale of the work only became fully apparent once the job was underway. However, morale was greatly boosted once the boat had left the shed and we were able to start replacing deck gear.
Many of the structural problems with the GRP over plywood deck were the result of leaky deck fittings. But readers with conventionally constructed glassfibre boats have no cause to feel smug or complacent about this – their decks also become structurally compromised when water reaches the foam or balsa core.
In theory boatbuilders should remove core material from the location of any through-bolted fittings, and although modern builders tend to be meticulous about this, it was not universally the case with older boats.
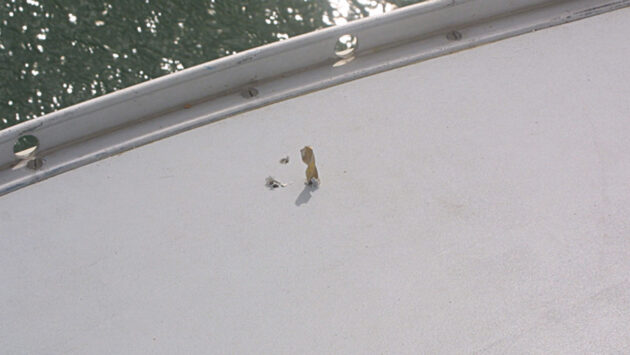
It’s vital therefore to make a permanent seal between the fitting and the deck, yet a huge number of boats suffer from leaking fittings. Most of Minestrone’s structural problems were due to fittings being bedded on a low-grade silicone, which had leaked over many years.
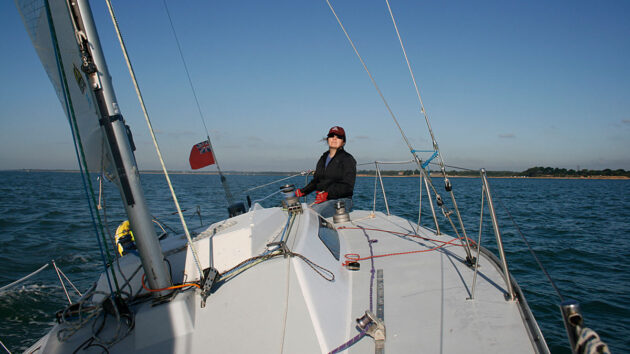
The new layout is much simpler and crisper, with only a short genoa car track each side. Changing the rig to a larger mainsail and non-overlapping jibs enabled the chain plates to be moved outboard, while maintaining an efficient sheeting position for the headsail. Credit: Rupert Holmes
To avoid similar problems in the future we chose Sikaflex 291, a marine-grade adhesive sealant that sticks to almost anything. Often the difficulty of removing fittings is cited as a reason for not using this product. However, in my experience a little additional hassle in removing an item is enormously preferable to any risk of needing to make remedial repairs to the deck following water ingress.
Even the very best sealant is ineffective without proper surface preparation. Almost nothing will stick permanently to silicone residue, so the first part of the preparation was to meticulously remove all traces of the previous sealant. This involved a combination of scraping, sanding and the application of plenty of solvents. If necessary, areas were also given a final sand to provide a good mechanical key for the Sikaflex to stick to.
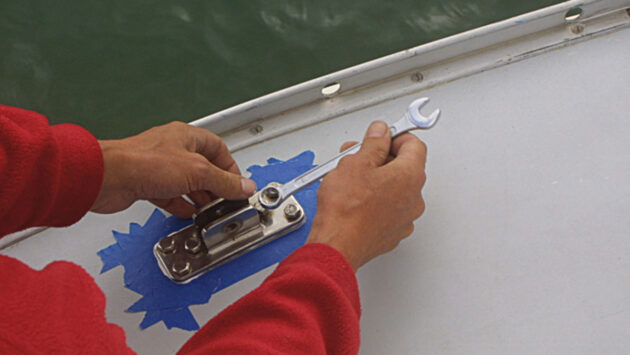
One problem with any sealant is dealing with the excess, which, if left in place, will look untidy. With experience it becomes easier to judge the amount that’s needed – this is the real key to making a neat job.
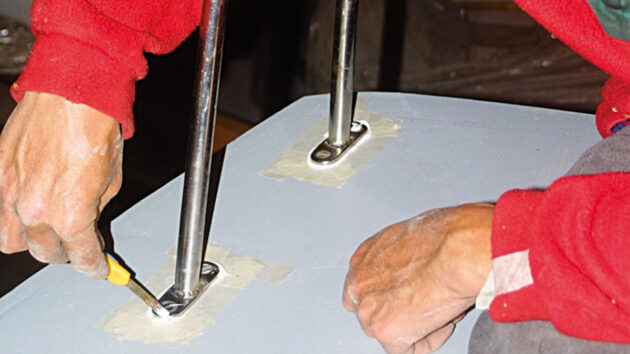
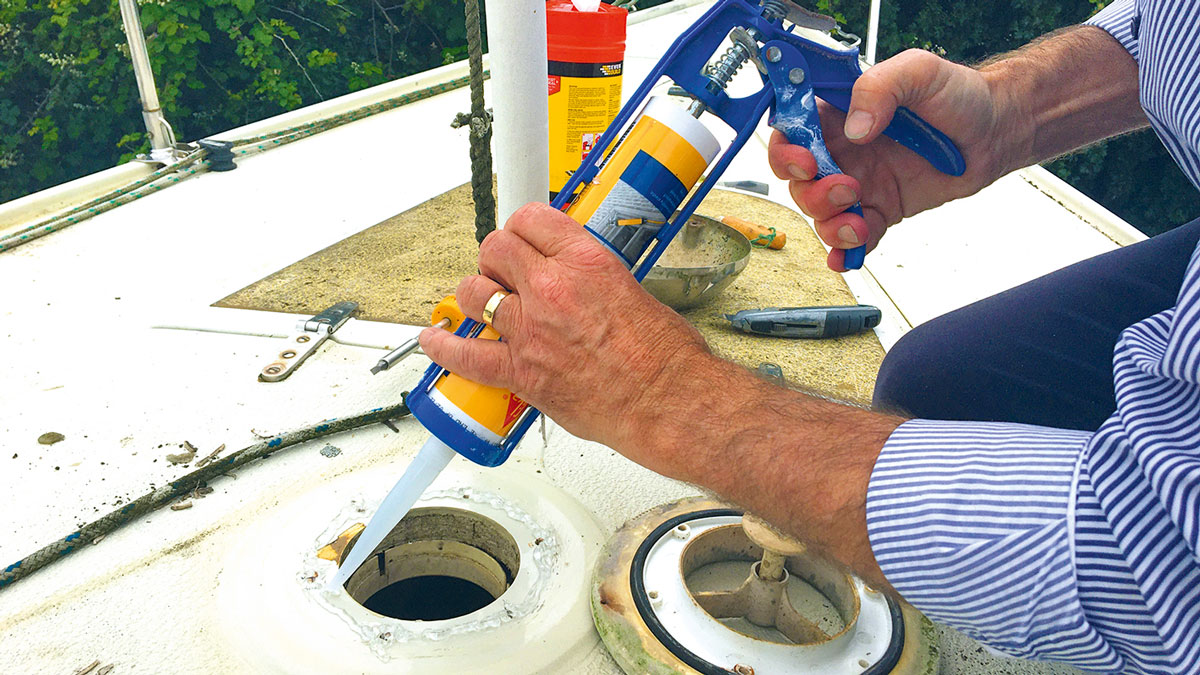
The bolt holes are the only route for water ingress, so a single bead of sealant run along the line of the bolt holes, and encircling them, is all that’s required. The knack is to figure out how thick that bead must be to fill the gap between the fitting and the deck without squeezing out too much.
To make tidying up easier, where possible we also masked both deck and fitting, so that sealant squeezed out of the joint could easily be cut away once it was mostly cured. The easiest way of doing this is to dry-fit the components first, and mask the deck around them.
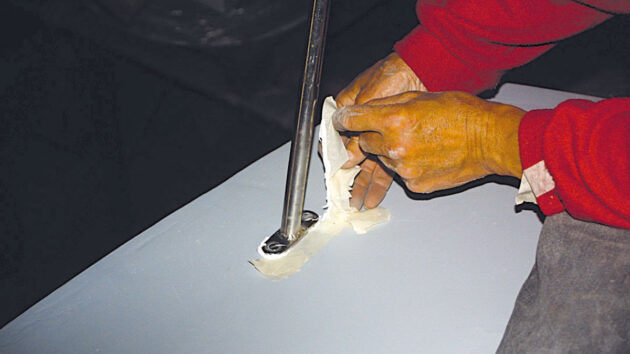
This technique works really well, providing the sealant is removed at the right time – too early and it gets really messy, too late and it can be awkward to remove. At other times we removed small amounts of sealant with a paint scraper, then a cloth soaked in white spirit. This was also necessary with some fittings, such as the sides of the feet of pushpit legs, that didn’t have enough surface area for the masking tape to stick reliably.
Spreading the load of deck gear
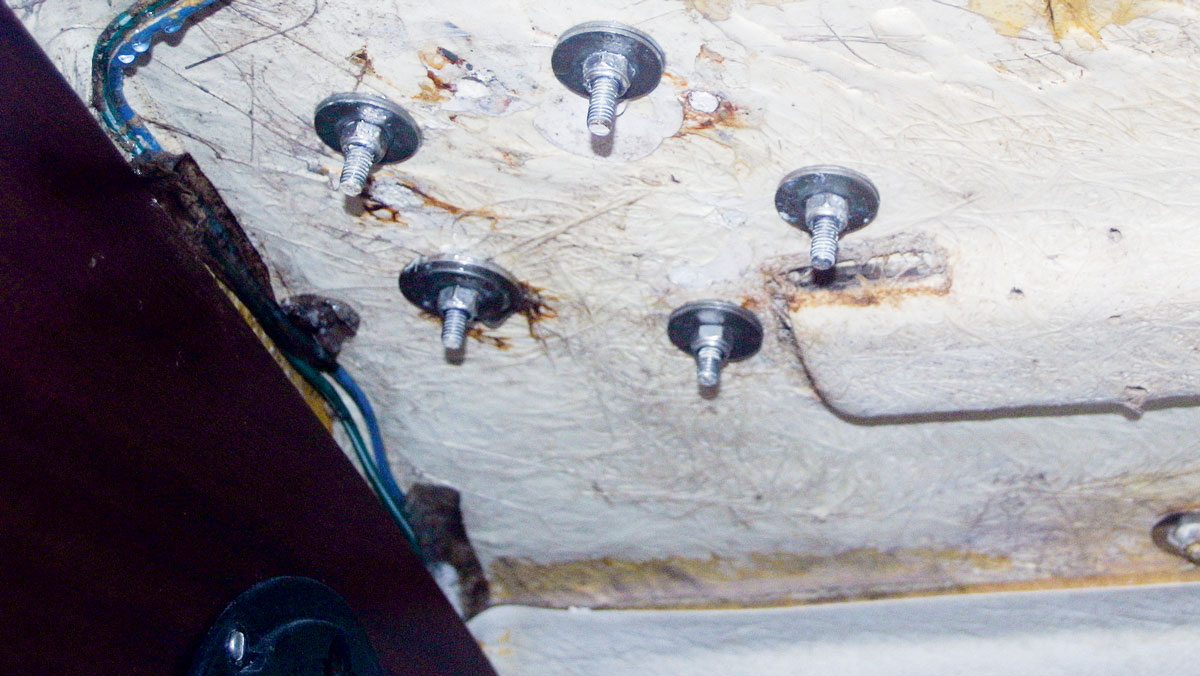
Decent-sized washers and backing pads are vital for securing deck gear properly, so I fitted the primary winches with backing pads sufficiently large to spread the load over the adjacent deck frames, offset with angled blocks to cope with the sloping side decks. The secondary winches and the mainsheet track were also given 10mm thick plywood backing pads, with large penny washers under each nut.
The coachroof clutches had just penny washers, and although we had planned to make backing pads for the new headsail car tracks, we ran out of time and just used penny washers to spread the load.
We were relieved that nothing broke in the demanding conditions – gusts of over 25 knots – we experienced on Minestrone’s first sail since the 1990s in last year’s Coutts Quarter Ton Cup. However, the coachroof under the secondary winches flexed disconcertingly under the loads of the spinnaker sheet and guy when we were flying downwind under full sail.
Another issue that came to light sailing upwind in the same race was that the deck started to fractionally lift away from the main bulkhead immediately below the jib car. With Minestrone’s original deck layout the chainplates held the deck down at this point, but I had moved them outboard, so I had to fit extra brackets to tie the deck (and tracks) to the bulkhead.
There was also a leak from the U-bolt for the vang and reefing lines, just aft of the mast step. However, removing and re-sealing the fitting, and the addition of two large washers at the top to increase the contact area of the sealant, easily solved this.
Toe rail and stanchions
The unconventional construction of Minestrone’s deck means that neither the toe rail nor the outer pair of the four main fastenings for the stanchions could be through-bolted. Instead, they are screwed into the two-inch deep hardwood beam shelf.
These are both items that are responsible for deck leaks on many boats, so it was particularly important to ensure they remained fully watertight, with no possibility of the screws pulling out. As well as using larger screws than the originals, we injected each screw hole with a runny mix of epoxy and microfibres before temporarily inserting the screw.
We then removed the screws before the mix had fully cured, leaving a strong threaded ‘socket’ in the timber. We fitted the largest washers possible under the bolts for the stanchions, including those for the small inner legs that reduce the loads on the outer pair of screws.
In addition, the large surface area of the toe rail would benefit from the adhesive properties of the Sikaflex 291. It’s an approach that seemed to work well – and in the big winds of the Quarter Ton Cup there was no evidence of movement around the spinnaker tweaker lines that were attached to the toe rail.
Windows
Minestrone’s original windows were badly crazed and so weak they both split in two parts when they were removed, so a new pair were made in 6mm acrylic sheet, using the old ones as a pattern. The new windows weren’t finished when she was launched, hence the scrap plywood plates that served the purpose initially.
The old windows were so brittle that they snapped when removed. Credit: Rupert Holmes
The old fastening holes had been filled in when the deck was re-faired, so they couldn’t be used again, but drilling new ones with a small bit was no problem. To avoid inducing stresses in the new acrylic, the screws were initially inserted only far enough for their threads to hold securely. They were then tightened hand-tight in stages, following a sequence akin to replacing the cylinder head of a car’s engine.
Finally, I gently tightened them with a screwdriver, following the same sequence.
Plywood panels were used while waiting for new windows. Credit: Rupert Holmes
With a long piece of acrylic, as with Minestrone’s windows, it’s important not to over-tighten the fastenings – the sealant must be sufficiently thick to allow the window to move fractionally relative to the coachroof to allow for thermal expansion and contraction. For this reason the fastening holes in the windows needed to be a full size (1mm) larger than the bolts used.
Planning the layout
One of the advantages of removing all the fittings to repair the deck was that we could start from scratch with a new deck layout, taking a much simplified and more modern approach.
When Minestrone was new in the mid-1970s the fashion was for tiny short-footed mainsails – so small as to be little more than a trim tab – and huge overlapping genoas. Although this was primarily to obtain a better rating (the old IOR system didn’t measure the headsail area aft of the mast) it was also a common arrangement on cruising boats of the period.
However, in addition to unwieldy headsails, this style of rig has a number of drawbacks. First, a plethora of genoa tracks are needed for the various sails – Minestrone had over 9m (30ft) split into three tracks each side.
Also, to achieve a sheeting angle that’s narrow enough for optimum upwind performance the chainplates need to be a long way inboard. Minestrone’s shroud base was barely more than 1.5m (5ft) wide, despite her beam of 2.8m (9ft 3in), creating huge loads in the rig and hull.
Another useful development is the advent of clutches, which reduce the number of winches needed – the original layout had seven – and simplify layouts.
Minestrone also needed a new mast and boom, so we looked for one that would allow her to set a much more modern arrangement, with non-overlapping jibs and a proportionately larger mainsail.
We were lucky in that the Quarter Ton Class lends a lot of support to owners. With some members having spent large amounts of money restoring their boats to, if anything, a better-than-new condition, we had a choice of second-hand gear that was of better quality and design than Minestrone’s original kit.
Final tweaks
The new rig allowed the chainplates to be moved as far outboard as possible, which reduced rig loads by around 50%. It also simplified the situation with the genoa car tracks – only one short length was needed on each side. It would have been possible to spend ages debating exactly where to fit this, and yet still find we’d got it wrong.
Instead, we made sure it was marginally outboard of where it would need to be. This allows tweakers to be used to achieve the best possible sheeting angle.
As many lines as possible were led aft to the companionway, via deck organisers and clutches.
These include halyards, pole up and downhauls, mainsail outhaul and vang. The new fractional rig would need a powerful backstay, which would be essential for trimming the mainsail, so we fitted and 8:1 purchase between the end of the wire and the chainplate, with a tail taken to jammers each side of the cockpit, where they can easily be reached from the helm.
Moving the chainplates
Credit: Rupert Holmes
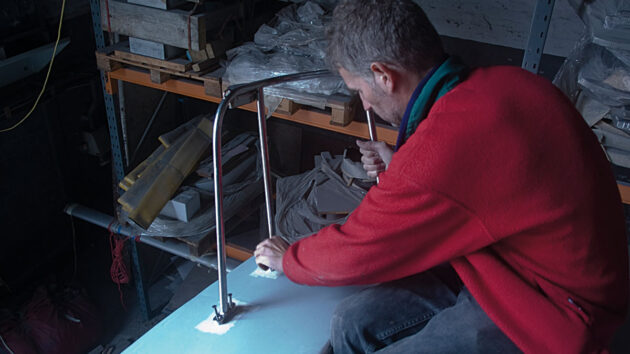
1. I fitted brackets below deck to spread the chainplate load, then used a pilot drill from below to locate the holes for the bolts.
Credit: Rupert Holmes
2. I could then bolt the chainplates down in their new outboard position, having first applied sealant to the bolt holes.
Replacing and sealing deck gear: step-by-step
Credit: Kass Schmitt
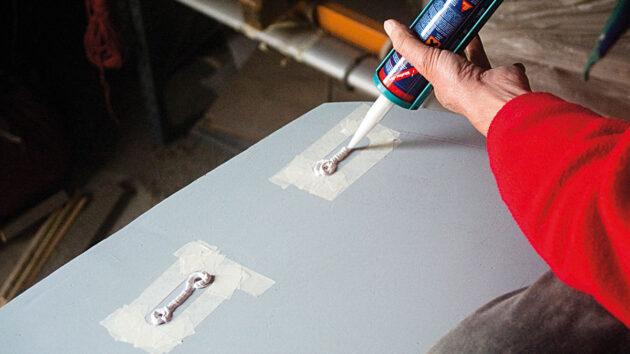
1. Apply sealant around the bolt holes for the new fitting, having first masked the deck.
Credit: Kass Schmitt
2. Place the fitting and tighten the bolts. Leave the fitting until the sealant has almost cured…
Credit: Kass Schmitt
3…then use a craft knife to cut away the excess sealant before removing the masking tape.
Credit: Kass Schmitt
4. The remaining sealant should come away neatly. Here, it would have been better to leave it a little longer
Using sealant to fit deck gear
It’s important to match the type of sealant you choose to the specific task for which it will be used. Silicones have a very low level of adhesion and will start to leak once fittings move under load, or the boat around them distorts. For this reason silicones are generally not recommended for use with deck hardware, despite the common practice of so doing.
Another problem with silicone sealants is that nothing else will stick to them, so they are of little use if they will need to be painted over. However, they can be useful in keeping dissimilar metals apart, for instance when attaching stainless steel fittings to an alloy mast or boom.
Polyurethanes, by contrast, have strong adhesive properties, which means there’s some scope for movement of the two surfaces relative to each other when under load without damaging the seal. This gives added protection against leaks, but can make removing fittings at a later date difficult.
However, these products are available with different levels of adhesion –Sikaflex 291 and 3M 4400, for instance, have a low level for use with general deck fittings, while Sikaflex 292 and 3M 5200 have a high level.
Life-seal is a mix of polyurethane and silicone that offers a good seal, while enabling fittings to be removed easily. Another class of sealants that allow this are polysulphides such as Life-caulk.
These adhere tenaciously to almost any substrate but never fully set, which can make them a good choice for fittings that need to be removed periodically. However, they are
not suitable for use with many plastics as the solvents used will cause the material to harden or split, although nylon, epoxy, and Delrin are okay in this respect.

Fitting a new toerail or grabrail on your sailboat or motorboat
Rupert Holmes explains the techniques for the removal and replacement of toerails and grabrails on our your boat
Best marine sealants and adhesives for boat jobs
With help from adhesive and sealant expert Laurie Brebner, PBO’s Ali Wood explains which works best for different jobs on…

Reparing plywood decks: stripping, filling and fairing
Rupert Holmes shows how to strip, fill and fair GRP-covered plywood decks
How to attach deck fittings securely
Rupert Holmes explains how to strongly attach new or replacement fittings to decks – and how to fill redundant old…

What to read more practical articles like Fitting and sealing new deck gear and winches?
A subscription to Practical Boat Owner magazine costs around 40% less than the cover price.
Print and digital editions are available through Magazines Direct – where you can also find the latest deals.
PBO is packed with information to help you get the most from boat ownership – whether sail or power.
-
-
-
- Take your DIY skills to the next level with trusted advice on boat maintenance and repairs
- Impartial, in-depth gear reviews
- Practical cruising tips for making the most of your time afloat
-
-
Follow us on Facebook, Instagram, TikTok and X