
Multihull sailor and retired electronics professional Dagnall Clutterbuck shares his affordable method for linking smart devices to his navigation system.
Considering a smart navigation system?
The advance of electronics, and especially home automation, have given rise to a range of extremely powerful and affordable small wireless devices.
This got me thinking –surely they could be utilised to enable a mobile display of navigation and battery management equipment on board.
More recently, small wireless devices have been combined with organic light-emitting diode touch screen displays, designed to be ‘smart’ light switches.

The device is a cheap instrument repeater –and much more. Photo: Dagnall Clutterbuck.
This do-it-yourself (DIY) project has repurposed one such module and made it into a highly affordable extra multifunction instrument repeater. It uses standard National Marine Electronics Association (NMEA) 0183 data sent from the boat’s wifi gateway.
NMEA is the communication standard used in the maritime industry for connecting engines, instruments and sensors on boats. This device will work with any wifi gateway that sends your boat instrument data (N2K or SeaTalk1 or NMEA0183) for use with phone apps.
What it does
Following some simple programming, I can now easily monitor the instruments on my 26ft catamaran. The unit also allows me new display options.
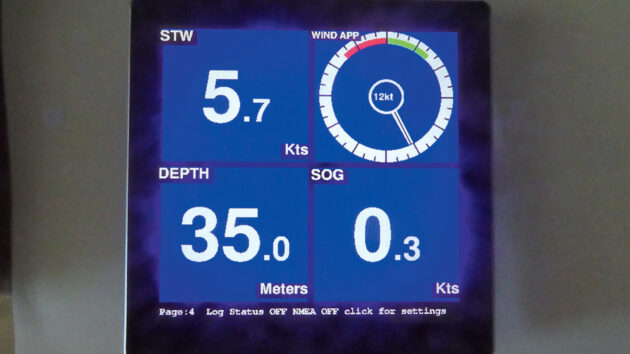
Example display of four instruments. Photo: Dagnall Clutterbuck.
The simplest display shows all four instruments on one screen, and I can use the touchscreen to swap back to a single instrument display, or to switch to new displays like a depth graph.
There is even a display that allows me to see the data from my Victron BLE devices so I can monitor battery voltage. The photo above shows the unit displaying voltage and current data from a Victron 300A shunt.
The code that programs the display is designed to work with boats that have a ‘wifi gateway’ to allow phone and tablet apps like Garmin or Navionics to see the boat’s depth or automatic identification system (AIS). The display wirelessly links to the wifi gateway access point (AP) and receives NMEA 0183 data via user datagram protocol (UDP).
The AP, passwords and UDP port number are selectable via a keyboard built into the display code, and will need to match those settings used by the gateway.
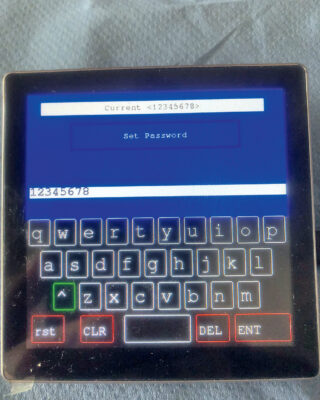
Keyboard for input of settings. Photo: Dagnall Clutterbuck.
Getting started on a smart navigation system
For the DIY repeater to work, you need a wifi gateway. It is common for chart-plotters to have this function built in, so many boats already have this capability, or will have fitted a wifi gateway to send NMEA 0183 formatted data via wifi to apps on tablets or phones.
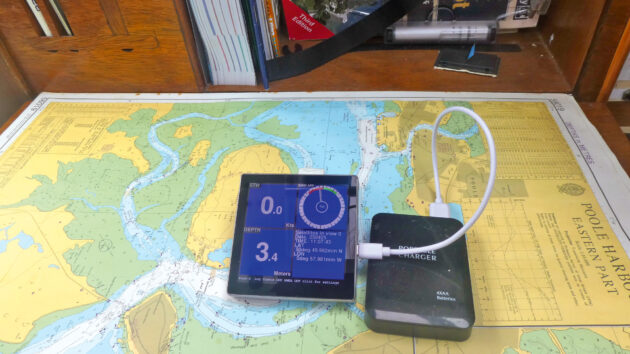
Repeater used wirelessly on the chart table
(a portable power pack is advisable to run it). Photo: Dagnall Clutterbuck.
Next, you need to buy the display. Only the front part is needed, but you can also buy it with mains relays and a fitting for 86mm square light switch boxes. Look for ‘ESP32-S3 Development Board 4in LCD TouchScreen Display 480×480’.
here are other 4in ESP32’s so be sure to find one with the ‘ST7701’ as that is the display the code is programmed for!
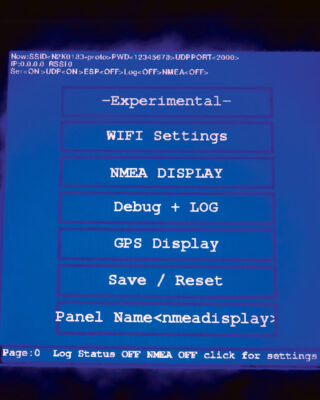
The display when you touch the bottom row of the screen. Photo: Dagnall Clutterbuck.
Enabling success
To get the module working, all that is required is a USB-A to USB-C lead. Plug the standard USB-A end into a personal computer, and the USB-C into the module and it will (usually) start by showing demonstration programs.
The Webserver website that the display will show on a smartphone or
tablet, viewed by a web-browser such as Chrome/Safari . Photo: Dagnall Clutterbuck.
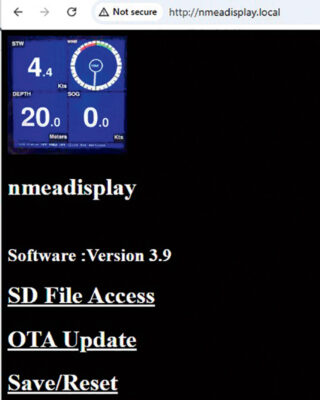
The Webserver website that the
display will show on a smartphone or tablet. Photo: Dagnall Clutterbuck.
To program the NMEA Display code, you’ll need to go to the GitHub repository (https://github.com/dagnall53/NMEADisplay).
Those familiar with Arduino Projects can extract the files and compile and program the code ‘into’ the module using Arduino. There is a README.md file that includes all the details.
If you are not familiar with Arduino and ESP32 programing, there is an easier way for non programmers: first, plug your module into a com port on your PC and record which port it is using. If confused, check Device Manager and look for the USB-SERIAL CH340 port. Remember this port number!
Next, click the link below to download the file ‘WebProgram.bat’ from the GitHub. (https://dagnall53.github.io/NMEADisplay/build/WebProgram.bat (Windows may object to downloading ‘bat files’, but you can override the objections!).
Save this file somewhere convenient, such as downloads, and run the program. It will download the latest binaries to the directory where you saved them and program the hardware. The program will then delete the binaries and the tool used to upload after it has completed, leaving just the WebProgram.bat file on your computer.
Full details are in the README.MD file in the GitHub.
Using it
The display currently understands wind, depth, speed through water (STW) and global positioning system (GPS), course-over-ground, latitude, longitude, speed-over-ground (SOG). The standard program will initially show a four-display page with wind, STW, depth and SOG/GPS.
Touching any one of these will change the display to another ‘page’ that gives more information. The wind goes to a larger display. The depth and speeds go to graphic displays to show past data etc.
Touching the screen again will take you to other pages, or back to the four display. It’s harder to describe than to do!
It also makes you realise how hard the big manufacturers work to get nice displays.
To set up the wifi and other options, touch the bottom row of the screen to find a page that allows you to set wifi settings, (using a keyboard as before) and then access other features. These settings pages include a debug screen where you can check the incoming NMEA data.
The standard module also includes a micro-SD card slot, and the program takes advantage of this to provide data logging features. These create ‘log’ files on the SD card that can be used to monitor your trip, or see AIS targets afterwards!
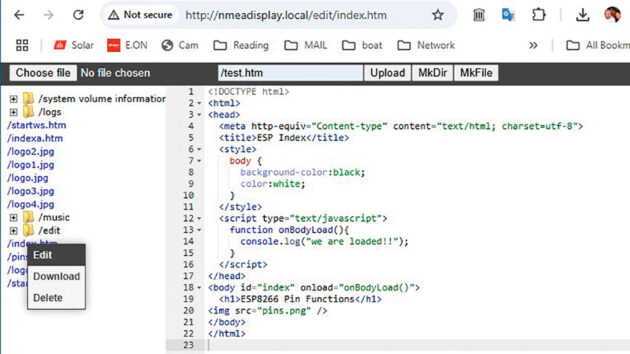
The program also includes a webserver that allows a connected phone or tablet to use a web browser to show and modify files on the SD card.
The ‘SD file access’ takes you to an editor. This allows easy access to the ‘config.txt’ file that allows setting of the wifi service set identifier (SSID), password or UDP port and other settings.
This can be more convenient than using the on-screen keyboard. The final feature of the web browser is that it includes an over the air (OTA) update capability. As new versions of the program are released, this OTA allows the display to update without needing the USB connection.
Fitting your smart navigation system on the boat
I made a very simple aluminium angle bracket for my display and fitted it to the removable back plate on the module, so that I could fit the display alongside my SeaTalk 60 series instruments.
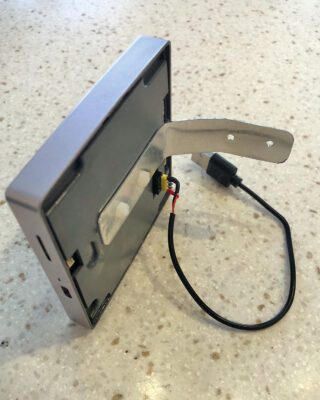
A simple bracket. Photo: Dagnall Clutterbuck.
I used plastic screws ‘just in case’ but they should be well clear of any of the electronics.
While the cover was off, I sprayed the board with some Aquacote waterproofing to see if it helps it in the marine air, although the instrument is fitted in a relatively dry place. Other sprays that are supposed to give some protection are also available.
My first tests used a simple USB-A to USB-C cable plugged into a convenient USB socket near the instruments (the same cable I used to initially program the board). Later, I connected another two-wire USB cable to the small socket on the back of the display, simply connecting the USB 5V and Ground.
It is also possible to buy small 12V to 5V converters that allow the display to be run from standard boat 12V supplies. The eight-pin socket that I used for the power also has serial in and out connections, so it would be possible to use these for a wired ‘serial’ connection to a NMEA instrument.
I would recommend adding an optocoupler if you want to do this, but the program already includes this as a possible input source.
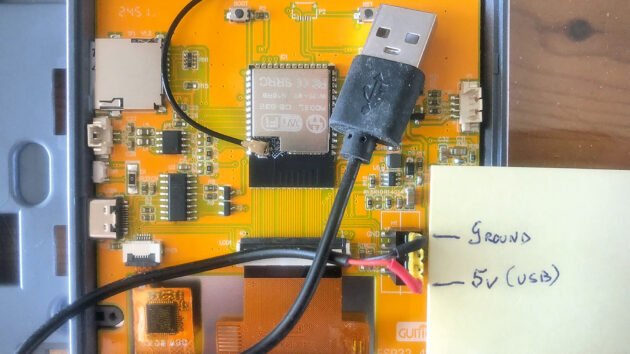
Wiring a fixed USB lead. Photo: Dagnall Clutterbuck.
All in all, this has been an interesting project and, as it is open source, I hope other PBO readers will have a go and suggest improvements!
References
The GITHUB location for the source code: https://github.com/dagnall53/NMEADisplay
The module is typically available on AliExpress: search ‘ESP32-S3 Arduino LVGL WIFI&Bluetooth Development Board 4.0 “480 * 480 Smart Display 4.0 inch LCD TFT Module Capacitive Touch’, and make sure it is the version with the ‘ST7701’ if there are two different versions. Other similar ‘4in’ ESP32 touchscreens exist, but will have different wiring, and so the program would need (small) modifications.
There is a forum for users of the Open Source NMEA Display here: www.vela navega.com/forum/viewforum.php?f=26 (or https://tinyurl.com/nejk4p5s)
Expect comment from Duncan Kent
More and more boat owners are incorporating a NMEA wifi gateway into their electronic navigation system to enable smart devices (other than proprietary instrument displays) to enable data manipulation from the vessel’s transducers, beyond the capabilities of a simple remote display.
This project by Dagnall Clutterbuck is an example of just how far a tech-savvy DIYer can go using electronic components and open-source code resources, both available online for very little, if not zero cost.
As modern systems now use the later version of NMEA protocol, NMEA2000 (N2K), rather than the earlier, more basic NMEA0183, I’m interested in how this works with them.
I’ll therefore be incorporating Dagnall’s system into a N2K device (hopefully with expert advice from Dagnell himself) and will report on the results of my own experiences in the near future!
Dagnall Clutterbuck is a retired electronics professional who sails a 26ft Catalac catamaran out of Hayling Island, on the South Coast.
How I switched to electronic charts
Ali Wood recalls her first sailing passage using electronic charts

Boat electronics repair: How to fix your boat’s instruments
If you can solder it’s always worth taking things apart and having a go at repairing them as a last…
Want to read more articles on smart navigation systems?

A subscription to Practical Boat Owner magazine costs around 40% less than the cover price.
Print and digital editions are available through Magazines Direct – where you can also find the latest deals.
PBO is packed with information to help you get the most from boat ownership – whether sail or power.
-
-
-
- Take your DIY skills to the next level with trusted advice on boat maintenance and repairs
- Impartial, in-depth gear reviews
- Practical cruising tips for making the most of your time afloat
-
-
Follow us on Facebook, Instagram, TikTok and Twitter